 Blog Virtualizacion Tu Blog de Virtualización en Español. Maquinas Virtuales (El Blog de Negu) en castellano. Blog informática vExpert Raul Unzue

Artículos relacionados


Kubernetes: Crear un cluster con 3 Masters y 3 Workers On-Premise
Hoy vamos a hacer una infraestructura Kubernetes de alta disponibilidad on-premise.
Serán 6 nodos en total, y los generaré bajo CentOS 7, y los mínimos que se marcan en un clúster kubernetes:
- 3 nodos Máster
- 3 nodos Workers o Minions
- Deshabilitar Selinux en todos los nodos
- swapoff -a
- Comentamos la línea en /etc/fstab
- Cargamos módulo:
-
[root@master01 ~]# modprobe br_netfilter
-
[root@master01 ~]# echo ‘1’ > /proc/sys/net/bridge/bridge-nf-call-iptables
-
Vamos a usar los siguientes nombres e Ips:
- Master01 – 192.168.2.30
- Master02 – 192.168.2 31
- Master03 – 192.168.2.32
- Worker01 – 192.168.2.33
- Worker02 – 192.168.2.34
- Worker03 – 192.168.2.35
- CIDR (Red Pods) – 10.69.0.0/12
- IP-VIRTUAL- 192.168.2.40
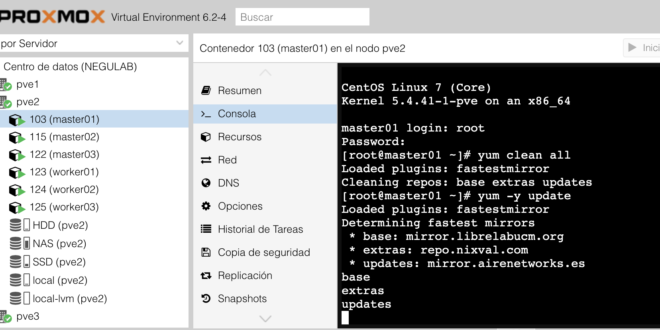
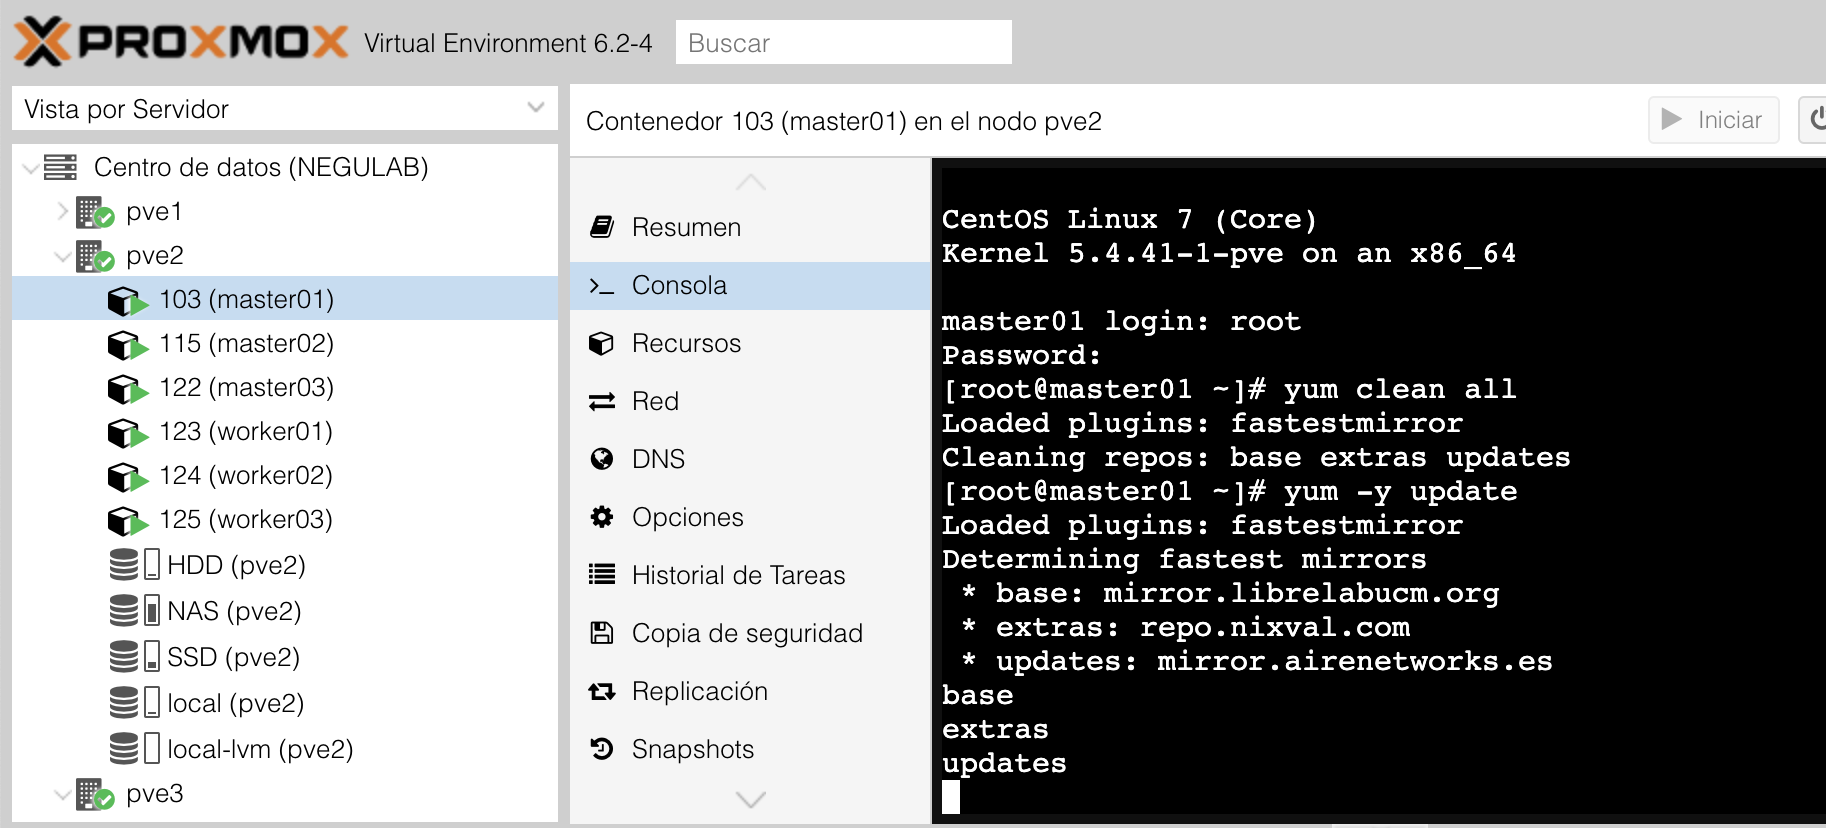
Lo primero que haremos una vez generados es actualizar los sistemas:
yum clean all

yum -y update
Instalaremos dos repos en cada nodo, epel y el de kubernetes con estos dos comandos:
yum -y install epel-release
cat < /etc/yum.repos.d/kubernetes.repo

[kubernetes]
name=Kubernetes

baseurl=https://packages.cloud.google.com/yum/repos/kubernetes-el7-x86_64

enabled=1

gpgcheck=1

repo_gpgcheck=1

gpgkey=https://packages.cloud.google.com/yum/doc/yum-key.gpg https://packages.cloud.google.com/yum/doc/rpm-package-key.gpg

EOF
yum install yum-utils -y
yum-config-manager –add-repo https://download.docker.com/linux/centos/docker-ce.repo
Y limpiamos la caché:
[root@master01 ~]# yum clean all

Loaded plugins: fastestmirror

Cleaning repos: base epel extras updates

Cleaning up list of fastest mirrors
Y agregamos al fichero host los nombres e ips de cada host:
echo "# ElBlogdeNegu HA Kubernetes

192.168.2.30 master01 master01.negu.local

192.168.2.31 master02 master02.negu.local

192.168.2.32 master03 master03.negu.local

192.168.2.33 worker01 worker01.negu.local

192.168.2.34 worker02 worker02.negu.local

192.168.2.35 worker03 worker03.negu.local" >> /etc/hosts
Instalaremos el servidor de tiempos para los nodos MASTER y adicionalmente chkconfig que no viene en los LXC que estoy utilizando para esto:
yum -y install ntp ntpdate ntp-doc chkconfig nano
Configuración
chkconfig ntpd on

ntpdate pool.ntp.org
Editamos nano /etc/ntp.conf
server 0.centos.pool.ntp.org iburst

server 1.centos.pool.ntp.org iburst

server 2.centos.pool.ntp.org iburst

server 3.centos.pool.ntp.org iburst

server 0.rhel.pool.ntp.org

server 1.rhel.pool.ntp.org

server 2.rhel.pool.ntp.org
Reiniciamos ntp
systemctl restart ntpd

systemctl enable ntpd
Instalamos los componentes de kubernetes necesarios tanto en los worker como en los masters. Os dejo como hacerlo en Centos 7. Este proceso no funciona con las versiones modernas o no he encontrado como hacerlo así que usaré la 1.10.4:
yum install -y kubelet-1.10.4 kubeadm-1.10.4 kubectl-1.10.4 kubernetes-cni-0.6.0 docker-ce-18.09.0 docker-ce-cli-18.09.0
Levantamos kubelet:
[root@master01 yum.repos.d]# systemctl start kubelet
Ahora tenemos que conseguir que tanto Kubernetes como Docker estén en el mismo grupo de control o cgroup. ¿Por qué hacemos esto? Los grupos de control permiten definir jerarquías en las que se agrupan los procesos de manera que un administrador puede definir con gran detalle la manera en la que se asignan los recursos (CPU, memoria y I/O).
Arrancamos docker:
systemctl start docker | systemctl enable docker

Created symlink from /etc/systemd/system/multi-user.target.wants/docker.service to /usr/lib/systemd/system/docker.service.
Comprobamos el cgroup donde se encuentra:
docker info | grep -i cgroup

WARNING: bridge-nf-call-ip6tables is disabled

Cgroup Driver: cgroupfs
Añadimos Kubernetes al cgroup:
sed -i 's/cgroup-driver=systemd/cgroup-driver=cgroupfs/g' /etc/systemd/system/kubelet.service.d/10-kubeadm.conf
Reiniciamos el servicio de kubelet:
systemctl daemon-reload | systemctl restart kubelet | systemctl enable kubelet
Si vuestros hosts tienen firewall deberéis abrir los puertos en el Firewall de los Masters y de los Workers:
Nodos Master:
sudo firewall-cmd --permanent --add-port=6443/tcp

sudo firewall-cmd --permanent --add-port=2379-2380/tcp

sudo firewall-cmd --permanent --add-port=10250/tcp

sudo firewall-cmd --permanent --add-port=10251/tcp

sudo firewall-cmd --permanent --add-port=10252/tcp

sudo firewall-cmd --permanent --add-port=10255/tcp

sudo firewall-cmd –-reload
Nodos Worker:
sudo firewall-cmd --permanent --add-port=10251/tcp

sudo firewall-cmd --permanent --add-port=10255/tcp

firewall-cmd –-reload
Ahora para configurar nuestro clúster con varios nodos, vamos a implementar un balanceador de carga con los master y keepalived, un clúster etcd para la base de datos de Kubernetes también con los masters y por último lanzaremos la instalación de los mismos como masters.
CLUSTER ETCD KUBERNETES
Procedemos con el proceso de instalación de ETCD, que como sabéis es la base de datos de Kubernetes. Lo haremos sólo sobre los nodos master:
[root@master01 ~]# curl -o /usr/local/bin/cfssl https://pkg.cfssl.org/R1.2/cfssl_linux-amd64

% Total    % Received % Xferd  Average Speed   Time    Time     Time  Current

Dload  Upload   Total   Spent    Left  Speed

100  9.8M  100  9.8M    0     0  3571k      0  0:00:02  0:00:02 --:--:-- 3571k

[root@master01 ~]# curl -o /usr/local/bin/cfssljson https://pkg.cfssl.org/R1.2/cfssljson_linux-amd64

% Total    % Received % Xferd  Average Speed   Time    Time     Time  Current

Dload  Upload   Total   Spent    Left  Speed

100 2224k  100 2224k    0     0  1181k      0  0:00:01  0:00:01 --:--:-- 1180k
Damos permisos de ejecución y agregamos al path:
[root@master01 ~]# chmod +x /usr/local/bin/cfssl*

[root@master01 ~]# export PATH=$PATH:/usr/local/bin
Generamos el directorio:
[root@master01 ~]# mkdir -p /etc/kubernetes/pki/etcd

[root@master01 ~]# cd /etc/kubernetes/pki/etcd

[root@master01 etcd]#
Generamos el fichero json con el siguiente contenido:
[root@master01 etcd]# nano ca-config.json
|
1 2 3 4 5 6 7 8 9 10 11 12 13 14 15 16 17 18 19 20 21 22 23 24 25 26 27 28 29 30 31 32 33 34 |
"signing": { "default": { "expiry": "43800h" }, "profiles": { "server": { "expiry": "43800h", "usages": [ "signing", "key encipherment", "server auth", "client auth" ] }, "client": { "expiry": "43800h", "usages": [ "signing", "key encipherment", "client auth" ] }, "peer": { "expiry": "43800h", "usages": [ "signing", "key encipherment", "server auth", "client auth" ] } } } } |
También el siguiente:
[root@master01 etcd]# nano ca-csr.json
|
1 2 3 4 5 6 7 |
{ "CN": "etcd", "key": { "algo": "rsa", "size": 2048 } } |
Otro más:
[root@master01 etcd]# nano client.json
|
1 2 3 4 5 6 7 |
{ "CN": "client", "key": { "algo": "ecdsa", "size": 256 } } |
Generamos los certificados:
[root@master01 etcd]# cfssl gencert -initca ca-csr.json | cfssljson -bare ca -

2020/06/05 20:07:41 [INFO] generating a new CA key and certificate from CSR

2020/06/05 20:07:41 [INFO] generate received request

2020/06/05 20:07:41 [INFO] received CSR

2020/06/05 20:07:41 [INFO] generating key: rsa-2048

2020/06/05 20:07:41 [INFO] encoded CSR

2020/06/05 20:07:41 [INFO] signed certificate with serial number 419851261149912840276143034971333000149416796056
Siguiente…
[root@master01 etcd]# cfssl gencert -ca=ca.pem -ca-key=ca-key.pem -config=ca-config.json -profile=client client.json | cfssljson -bare client

2020/06/05 20:10:52 [INFO] generate received request

2020/06/05 20:10:52 [INFO] received CSR

2020/06/05 20:10:52 [INFO] generating key: ecdsa-256

2020/06/05 20:10:52 [INFO] encoded CSR

2020/06/05 20:10:52 [INFO] signed certificate with serial number 620269070185116287325716197674156814868871535590

2020/06/05 20:10:52 [WARNING] This certificate lacks a "hosts" field. This makes it unsuitable for

websites. For more information see the Baseline Requirements for the Issuance and Management

of Publicly-Trusted Certificates, v.1.1.6, from the CA/Browser Forum (https://cabforum.org);

specifically, section 10.2.3 ("Information Requirements").
Ahora en los otros masters generamos el directorio:
[root@master02 ~]# mkdir -p /etc/kubernetes/pki/etcd

[root@master03 ~]# mkdir -p /etc/kubernetes/pki/etcd
Al ser unos LXC me faltan paquetes:
yum install openssh-server -y

systemctl start sshd | systemctl enable sshd
Copiamos los certificados en el nodo 2:
[root@master01 etcd]# scp * root@master02:/etc/kubernetes/pki/etcd/

The authenticity of host 'master02 (192.168.2.31)' can't be established.

ECDSA key fingerprint is SHA256:DhjvQXfiz68mCgKoYP+gR/FV3yO/jJSKH6gNnWEpzrE.

ECDSA key fingerprint is MD5:1d:b2:96:64:da:47:97:aa:06:4b:c3:4c:da:09:7c:6e.

Are you sure you want to continue connecting (yes/no)? yes

Warning: Permanently added 'master02,192.168.2.31' (ECDSA) to the list of known hosts.

root@master02's password:

ca-csr.json                                                           100%   85   412.2KB/s   00:00

ca-key.pem                                                            100% 1675    12.7MB/s   00:00

ca.csr                                                                100%  883     7.6MB/s   00:00

ca.pem                                                                100% 1127    10.1MB/s   00:00

client-key.pem                                                        100%  227     2.0MB/s   00:00

client.csr                                                            100%  351     3.4MB/s   00:00

client.json                                                           100%   89   889.3KB/s   00:00

client.pem                                                            100%  875     7.4MB/s   00:00

config.json                                                           100%  867     7.3MB/s   00:00
Copiamos los certificados en cada nodo, en este caso el 3:
[root@master01 etcd]# scp * root@master03:/etc/kubernetes/pki/etcd/

The authenticity of host 'master03 (192.168.2.32)' can't be established.

ECDSA key fingerprint is SHA256:+q3PGBoikHeWIDvLQStWR/Ld5TM1C/Gps9TIc1JStcM.

ECDSA key fingerprint is MD5:5f:79:d6:1d:b7:17:55:25:24:2f:61:95:6a:20:1b:e1.

Are you sure you want to continue connecting (yes/no)? yes

Warning: Permanently added 'master03,192.168.2.32' (ECDSA) to the list of known hosts.

root@master03's password:

ca-csr.json                                                           100%   85   586.7KB/s   00:00

ca-key.pem                                                            100% 1675    13.6MB/s   00:00

ca.csr                                                                100%  883     8.6MB/s   00:00

ca.pem                                                                100% 1127     9.6MB/s   00:00

client-key.pem                                                        100%  227     2.2MB/s   00:00

client.csr                                                            100%  351     3.8MB/s   00:00

client.json                                                           100%   89     1.0MB/s   00:00

client.pem                                                            100%  875     8.6MB/s   00:00

config.json                                                           100%  867     8.7MB/s   00:00
[root@master01 /]# cd /etc/kubernetes/pki/etcd

[root@master02 /]# cd /etc/kubernetes/pki/etcd

[root@master03 /]# cd /etc/kubernetes/pki/etcd
Repetimos en cada master estos comandos:
[root@master01 etcd]# export PEER_NAME=$(hostname)

[root@master01 etcd]# export PRIVATE_IP=$(ip addr show eth0 | grep -Po 'inet \K[\d.]+')

[root@master01 etcd]# cfssl print-defaults csr > config.json

[root@master01 etcd]# sed -i 's/www\.example\.net/'"$PRIVATE_IP"'/' config.json

[root@master01 etcd]# sed -i 's/example\.net/'"$PEER_NAME"'/' config.json

[root@master01 etcd]# sed -i '0,/CN/{s/example\.net/'"$PEER_NAME"'/}' config.json

[root@master01 etcd]# cfssl gencert -ca=ca.pem -ca-key=ca-key.pem -config=ca-config.json -profile=server config.json | cfssljson -bare server

[root@master01 etcd]# cfssl gencert -ca=ca.pem -ca-key=ca-key.pem -config=ca-config.json -profile=peer config.json | cfssljson -bare peer
Vamos al nodo 2:
[root@master02 etcd]# export PEER_NAME=$(hostname)

[root@master02 etcd]# export PRIVATE_IP=$(ip addr show eth0 | grep -Po 'inet \K[\d.]+')

[root@master02 etcd]# cfssl print-defaults csr > config.json

[root@master02 etcd]# sed -i 's/www\.example\.net/'"$PRIVATE_IP"'/' config.json

[root@master02 etcd]# sed -i 's/example\.net/'"$PEER_NAME"'/' config.json

[root@master02 etcd]# sed -i '0,/CN/{s/example\.net/'"$PEER_NAME"'/}' config.json

[root@master02 etcd]# cfssl gencert -ca=ca.pem -ca-key=ca-key.pem -config=ca-config.json -profile=server config.json | cfssljson -bare server

2020/06/05 20:55:49 [INFO] generate received request

2020/06/05 20:55:49 [INFO] received CSR

2020/06/05 20:55:49 [INFO] generating key: ecdsa-256

2020/06/05 20:55:49 [INFO] encoded CSR

2020/06/05 20:55:49 [INFO] signed certificate with serial number 554013443032279778125681764143844984517911342103

2020/06/05 20:55:49 [WARNING] This certificate lacks a "hosts" field. This makes it unsuitable for

websites. For more information see the Baseline Requirements for the Issuance and Management

of Publicly-Trusted Certificates, v.1.1.6, from the CA/Browser Forum (https://cabforum.org);

specifically, section 10.2.3 ("Information Requirements").

[root@master02 etcd]# cfssl gencert -ca=ca.pem -ca-key=ca-key.pem -config=ca-config.json -profile=peer config.json | cfssljson -bare peer

2020/06/05 20:55:59 [INFO] generate received request

2020/06/05 20:55:59 [INFO] received CSR

2020/06/05 20:55:59 [INFO] generating key: ecdsa-256

2020/06/05 20:55:59 [INFO] encoded CSR

2020/06/05 20:55:59 [INFO] signed certificate with serial number 128171013866006947111554046207376722100116366326

2020/06/05 20:55:59 [WARNING] This certificate lacks a "hosts" field. This makes it unsuitable for

websites. For more information see the Baseline Requirements for the Issuance and Management

of Publicly-Trusted Certificates, v.1.1.6, from the CA/Browser Forum (https://cabforum.org);

specifically, section 10.2.3 ("Information Requirements").
Reperimos los pasos en el nodo 3:
[root@master03 etcd]# export PEER_NAME=$(hostname)

[root@master03 etcd]# export PRIVATE_IP=$(ip addr show eth0 | grep -Po 'inet \K[\d.]+')

[root@master03 etcd]# cfssl print-defaults csr > config.json

[root@master03 etcd]# sed -i 's/www\.example\.net/'"$PRIVATE_IP"'/' config.json

[root@master03 etcd]# sed -i 's/example\.net/'"$PEER_NAME"'/' config.json

[root@master03 etcd]# sed -i '0,/CN/{s/example\.net/'"$PEER_NAME"'/}' config.json

[root@master03 etcd]# cfssl gencert -ca=ca.pem -ca-key=ca-key.pem -config=ca-config.json -profile=server config.json | cfssljson -bare server

2020/06/05 20:57:29 [INFO] generate received request

2020/06/05 20:57:29 [INFO] received CSR

2020/06/05 20:57:29 [INFO] generating key: ecdsa-256

2020/06/05 20:57:30 [INFO] encoded CSR

2020/06/05 20:57:30 [INFO] signed certificate with serial number 575494725680891079081199443701902691463750185314

2020/06/05 20:57:30 [WARNING] This certificate lacks a "hosts" field. This makes it unsuitable for

websites. For more information see the Baseline Requirements for the Issuance and Management

of Publicly-Trusted Certificates, v.1.1.6, from the CA/Browser Forum (https://cabforum.org);

specifically, section 10.2.3 ("Information Requirements").

[root@master03 etcd]# cfssl gencert -ca=ca.pem -ca-key=ca-key.pem -config=ca-config.json -profile=peer config.json | cfssljson -bare peer

2020/06/05 20:57:39 [INFO] generate received request

2020/06/05 20:57:39 [INFO] received CSR

2020/06/05 20:57:39 [INFO] generating key: ecdsa-256

2020/06/05 20:57:39 [INFO] encoded CSR

2020/06/05 20:57:39 [INFO] signed certificate with serial number 572205155506831767718863316059905534535242791992

2020/06/05 20:57:39 [WARNING] This certificate lacks a "hosts" field. This makes it unsuitable for

websites. For more information see the Baseline Requirements for the Issuance and Management

of Publicly-Trusted Certificates, v.1.1.6, from the CA/Browser Forum (https://cabforum.org);

specifically, section 10.2.3 ("Information Requirements").
En los tres nodos master:
yum -y install etcd

touch /etc/etcd.env

echo "PEER_NAME=$PEER_NAME" >> /etc/etcd.env

echo "PRIVATE_IP=$PRIVATE_IP" >> /etc/etcd.env
Hay que crear un fichero en etcd.service en /etc/systemd/system/
[root@master01 etcd]# nano /etc/systemd/system/etcd.service
[Unit]
Description=etcd

Documentation=https://github.com/coreos/etcd

Conflicts=etcd.service

Conflicts=etcd2.service
[Service]
EnvironmentFile=/etc/etcd.env

Type=notify

Restart=always

RestartSec=5s

LimitNOFILE=40000

TimeoutStartSec=0

ExecStart=/bin/etcd --name   --data-dir /var/lib/etcd --listen-client-urls http://:2379,http://127.0.0.1:2379 --advertise-client-urls http://:2379 --listen-peer-urls http://:2380 --initial-advertise-peer-urls http://:2380 --cert-file=/etc/kubernetes/pki/etcd/server.pem --key-file=/etc/kubernetes/pki/etcd/server-key.pem --trusted-ca-file=/etc/kubernetes/pki/etcd/ca.pem --peer-cert-file=/etc/kubernetes/pki/etcd/peer.pem --peer-key-file=/etc/kubernetes/pki/etcd/peer-key.pem --peer-trusted-ca-file=/etc/kubernetes/pki/etcd/ca.pem --initial-cluster master-0=http://:2380,master-1=http://:2380,master-2=http://:2380 --initial-cluster-token my-etcd-token --initial-cluster-state new --client-cert-auth=false --peer-client-cert-auth=false
[Install]
WantedBy=multi-user.target
Os dejo el ejemplo de uno de los nodos:
[Unit]
Description=etcd

Documentation=https://github.com/coreos/etcd

Conflicts=etcd.service

Conflicts=etcd2.service
[Service]
EnvironmentFile=/etc/etcd.env

Type=notify

Restart=always

RestartSec=5s

LimitNOFILE=40000

TimeoutStartSec=0

ExecStart=/bin/etcd --name master01 --data-dir /var/lib/etcd --listen-client-urls http://192.168.2.30:2379,http://127.0.0.1:2379 --advertise-client-urls http://192.168.2.30:2379 --listen-peer-urls http://192.168.2.30:2380 --initial-advertise-peer-urls http://192.168.2.30:2380 --cert-file=/etc/kubernetes/pki/etcd/server.pem --key-file=/etc/kubernetes/pki/etcd/server-key.pem --trusted-ca-file=/etc/kubernetes/pki/etcd/ca.pem --peer-cert-file=/etc/kubernetes/pki/etcd/peer.pem --peer-key-file=/etc/kubernetes/pki/etcd/peer-key.pem --peer-trusted-ca-file=/etc/kubernetes/pki/etcd/ca.pem --initial-cluster master01=http://192.168.2.30:2380,master02=http://192.168.2.31:2380,master03=http://192.168.2.32:2380 --initial-cluster-token my-etcd-token --initial-cluster-state new --client-cert-auth=false --peer-client-cert-auth=false
[Install]
WantedBy=multi-user.target
Copiamos el fichero y modificamos las líneas que corresponden al host y la IP:
[root@master01 system]# scp etcd.service root@master02:/etc/systemd/system/

root@master02's password:

etcd.service                                                          100% 1100     4.7MB/s   00:00

[root@master01 system]# scp etcd.service root@master03:/etc/systemd/system/

root@master03's password:

etcd.service                                                          100% 1100     4.6MB/s   00:00
Y las líneas que cambio en cada nodo:
MASTER02:
ExecStart=/bin/etcd --name master02 --data-dir /var/lib/etcd --listen-client-urls http://192.168.2.31:2379,http://127.0.0.1:2379 --advertise-client-urls http://192.168.2.31:2379 --listen-peer-urls http://192.168.2.31:2380 --initial-advertise-peer-urls http://192.168.2.31:2380 --cert-file=/etc/kubernetes/pki/etcd/server.pem --key-file=/etc/kubernetes/pki/etcd/server-key.pem --trusted-ca-file=/etc/kubernetes/pki/etcd/ca.pem --peer-cert-file=/etc/kubernetes/pki/etcd/peer.pem --peer-key-file=/etc/kubernetes/pki/etcd/peer-key.pem --peer-trusted-ca-file=/etc/kubernetes/pki/etcd/ca.pem --initial-cluster master01=http://192.168.2.30:2380,master02=http://192.168.2.31:2380,master03=http://192.168.2.32:2380 --initial-cluster-token my-etcd-token --initial-cluster-state new --client-cert-auth=false --peer-client-cert-auth=false
MASTER03:
ExecStart=/bin/etcd --name master03 --data-dir /var/lib/etcd --listen-client-urls http://192.168.2.32:2379,http://127.0.0.1:2379 --advertise-client-urls http://192.168.2.32:2379 --listen-peer-urls http://192.168.2.32:2380 --initial-advertise-peer-urls http://192.168.2.32:2380 --cert-file=/etc/kubernetes/pki/etcd/server.pem --key-file=/etc/kubernetes/pki/etcd/server-key.pem --trusted-ca-file=/etc/kubernetes/pki/etcd/ca.pem --peer-cert-file=/etc/kubernetes/pki/etcd/peer.pem --peer-key-file=/etc/kubernetes/pki/etcd/peer-key.pem --peer-trusted-ca-file=/etc/kubernetes/pki/etcd/ca.pem --initial-cluster master01=http://192.168.2.30:2380,master02=http://192.168.2.31:2380,master03=http://192.168.2.32:2380 --initial-cluster-token my-etcd-token --initial-cluster-state new --client-cert-auth=false --peer-client-cert-auth=false
Arrancamos cluster en los tres nodos:
[root@master02 etcd]# systemctl daemon-reload

[root@master02 etcd]# systemctl enable etcd

Created symlink from /etc/systemd/system/multi-user.target.wants/etcd.service to /etc/systemd/system/etcd.service.

[root@master02 etcd]# systemctl start etcd

[root@master02 etcd]# etcdctl cluster-health

member 23b686e5b92c96f2 is unreachable: no available published client urls

member 85469a4d14bbbb7a is unreachable: no available published client urls

member 9b8baa2b891aa1c9 is healthy: got healthy result from http://192.168.2.30:2379

cluster is degraded
Como son 3 nodos da degradado:
[root@master02 etcd]# systemctl daemon-reload

[root@master02 etcd]# systemctl enable etcd

Created symlink from /etc/systemd/system/multi-user.target.wants/etcd.service to /etc/systemd/system/etcd.service.

[root@master02 etcd]# systemctl start etcd

[root@master02 etcd]# etcdctl cluster-health

member 23b686e5b92c96f2 is unreachable: no available published client urls

member 85469a4d14bbbb7a is healthy: got healthy result from http://192.168.2.31:2379

member 9b8baa2b891aa1c9 is healthy: got healthy result from http://192.168.2.30:2379

cluster is degraded
Cuando ya tenemos los 3 se pone healthy:
[root@master03 system]# systemctl daemon-reload

[root@master03 system]# systemctl enable etcd

Created symlink from /etc/systemd/system/multi-user.target.wants/etcd.service to /etc/systemd/system/etcd.service.

[root@master03 system]# systemctl start etcd

[root@master03 system]# etcdctl cluster-health

member 23b686e5b92c96f2 is healthy: got healthy result from http://192.168.2.32:2379

member 85469a4d14bbbb7a is healthy: got healthy result from http://192.168.2.31:2379

member 9b8baa2b891aa1c9 is healthy: got healthy result from http://192.168.2.30:2379

cluster is healthy
CONFIGURAR KEEPALIVED KUBERNETES
Para darle balanceo de carga usaremos keepalived, volvemos a trabajar en los masters. Instalamos el software en cada nodo:
yum -y install keepalived
Hacemos una copia del fichero de configuración:
[root@master01 system]# cp /etc/keepalived/keepalived.conf /etc/keepalived/keepalived.conf.old
Vacíamos el fichero:
[root@master01 system]# echo "" > /etc/keepalived/keepalived.conf
Ahora editamos el fichero de cada nodo /etc/keepalived/keepalived.conf y agregaremos el siguiente contenido:
|
1 2 3 4 5 6 7 8 9 10 11 12 13 14 15 16 17 18 19 20 21 22 23 24 25 26 27 |
! Configuration File for keepalived global_defs { router_id LVS_DEVEL } vrrp_script check_apiserver { script "/etc/keepalived/check_apiserver.sh" interval 3 weight -2 fall 10 rise 2 } vrrp_instance VI_1 { state <state> interface <interface> virtual_router_id 51 priority <priority> authentication { auth_type PASS auth_pass elblogdenegu } virtual_ipaddress { <virtual ip> } track_script { check_apiserver } } |
Configuración nodos. Uno de ellos actuará como MASTER y los otros como SLAVE, eso lo definiremos en el parámetro STATE. Por otra parte, tendremos que verificar que el interfaz de nuestros nodos es eth0 y no otro. Le daremos una prioridad más alta al MASTER, en mi caso 100 En Virtual_IP añadiremos la ip virtual del cluster:
|
1 2 3 4 5 6 7 8 9 10 11 12 13 14 15 16 17 18 19 20 21 22 23 24 25 26 27 28 29 |
nano /etc/keepalived/keepalived.conf ! Configuration File for keepalived global_defs { router_id LVS_DEVEL } vrrp_script check_apiserver { script "/etc/keepalived/check_apiserver.sh" interval 3 weight -2 fall 10 rise 2 } vrrp_instance VI_1 { state MASTER interface eth0 virtual_router_id 51 priority 101 authentication { auth_type PASS auth_pass elblogdenegu } virtual_ipaddress { 192.168.2.40 } track_script { check_apiserver } } |
Para los SLAVE:
|
1 2 3 4 5 6 7 8 9 10 11 12 13 14 15 16 17 18 19 20 21 22 23 24 25 26 27 |
! Configuration File for keepalived global_defs { router_id LVS_DEVEL } vrrp_script check_apiserver { script "/etc/keepalived/check_apiserver.sh" interval 3 weight -2 fall 10 rise 2 } vrrp_instance VI_1 { state SLAVE interface eth0 virtual_router_id 51 priority 90 authentication { auth_type PASS auth_pass elblogdenegu } virtual_ipaddress { 192.168.2.40 } track_script { check_apiserver } } |
Generaremos un fichero para chequear el funcionamiento del servicio en cada nodo al arrancarlo con su IP:
[root@master01 system]# nano /etc/keepalived/check_apiserver.sh
|
1 2 3 4 5 6 7 8 9 10 11 |
#!/bin/sh errorExit() { echo "*** $*" 1>&2 exit 1 } curl --silent --max-time 2 --insecure https://localhost:6443/ -o /dev/null || errorExit "Error GET https://localhost:6443/" if ip addr | grep -q 192.168.2.40; then curl --silent --max-time 2 --insecure https://192.168.2.40:6443/ -o /dev/null || errorExit "Error GET https://192.168.2.40:6443/" fi |
Le damos permisos de ejecución:
[root@master01 system]# chmod +x /etc/keepalived/check_apiserver.sh
Arrancamos servicio y habilitamos su inicio automático en cada nodo, empezando por el MASTER:
[root@master01 system]# systemctl start keepalived

[root@master01 system]# systemctl enable keepalived

Created symlink from /etc/systemd/system/multi-user.target.wants/keepalived.service to /usr/lib/systemd/system/keepalived.service.
Podéis ver el estado del servicio arrancado y hacer un ping a la IP virtual para verificar que la configuración está bien:

CLUSTER KUBERNETES
Por último, para terminar con los MASTERS, vamos a ejecutar el cluster de Kubernetes, que es lo que verdaderamente nos interesa. Lo haremos con un fichero CONFIG.YAML con el siguiente contenido, en mi caso:
|
1 2 3 4 5 6 7 8 9 10 11 12 13 14 15 16 17 18 |
apiVersion: kubeadm.k8s.io/v1alpha1 kind: MasterConfiguration api: advertiseAddress: 192.168.2.30 etcd: endpoints: - http://192.168.2.30:2379 - http://192.168.2.31:2379 - http://192.168.2.32:2379 caFile: /etc/kubernetes/pki/etcd/ca.pem certFile: /etc/kubernetes/pki/etcd/client.pem keyFile: /etc/kubernetes/pki/etcd/client-key.pem networking: podSubnet: 10.69.0.0/12 apiServerCertSANs: - 192.168.2.40 apiServerExtraArgs: endpoint-reconciler-type: lease |
Lo instalaríamos de la siguiente forma desde el master01:
kubeadm init --config=config.yaml
En los otros master02 y master03, copiamos el fichero y le cambiamos la IP del master:
  advertiseAddress: 192.168.2.31

advertiseAddress: 192.168.2.32
[root@master03 ~]# kubeadm init --config=config.yaml --ignore-preflight-errors=SystemVerification

[init] Using Kubernetes version: v1.10.13

[init] Using Authorization modes: [Node RBAC]
[preflight] Running pre-flight checks.

[preflight] The system verification failed. Printing the output from the verification:

KERNEL_VERSION: 3.10.0-1127.10.1.el7.x86_64

CONFIG_NAMESPACES: enabled

CONFIG_NET_NS: enabled

CONFIG_PID_NS: enabled

CONFIG_IPC_NS: enabled

CONFIG_UTS_NS: enabled

CONFIG_CGROUPS: enabled

CONFIG_CGROUP_CPUACCT: enabled

CONFIG_CGROUP_DEVICE: enabled

CONFIG_CGROUP_FREEZER: enabled

CONFIG_CGROUP_SCHED: enabled

CONFIG_CPUSETS: enabled

CONFIG_MEMCG: enabled

CONFIG_INET: enabled

CONFIG_EXT4_FS: enabled (as module)

CONFIG_PROC_FS: enabled

CONFIG_NETFILTER_XT_TARGET_REDIRECT: enabled (as module)

CONFIG_NETFILTER_XT_MATCH_COMMENT: enabled (as module)

CONFIG_OVERLAY_FS: enabled (as module)

CONFIG_AUFS_FS: not set - Required for aufs.

CONFIG_BLK_DEV_DM: enabled (as module)

DOCKER_VERSION: 18.09.0

OS: Linux

CGROUPS_CPU: enabled

CGROUPS_CPUACCT: enabled

CGROUPS_CPUSET: enabled

CGROUPS_DEVICES: enabled

CGROUPS_FREEZER: enabled

CGROUPS_MEMORY: enabled

[WARNING SystemVerification]: unsupported docker version: 18.09.0

[WARNING Firewalld]: firewalld is active, please ensure ports [6443 10250] are open or your cluster may not function correctly

[certificates] Generated ca certificate and key.

[certificates] Generated apiserver certificate and key.

[certificates] apiserver serving cert is signed for DNS names [master03.negu.local kubernetes kubernetes.default kubernetes.default.svc kubernetes.default.svc.cluster.local] and IPs [10.96.0.1 192.168.2.32 192.168.2.40]
[certificates] Generated apiserver-kubelet-client certificate and key.

[certificates] Generated sa key and public key.

[certificates] Generated front-proxy-ca certificate and key.

[certificates] Generated front-proxy-client certificate and key.

[certificates] Valid certificates and keys now exist in "/etc/kubernetes/pki"

[kubeconfig] Wrote KubeConfig file to disk: "/etc/kubernetes/admin.conf"

[kubeconfig] Wrote KubeConfig file to disk: "/etc/kubernetes/kubelet.conf"

[kubeconfig] Wrote KubeConfig file to disk: "/etc/kubernetes/controller-manager.conf"

[kubeconfig] Wrote KubeConfig file to disk: "/etc/kubernetes/scheduler.conf"

[controlplane] Wrote Static Pod manifest for component kube-apiserver to "/etc/kubernetes/manifests/kube-apiserver.yaml"

[controlplane] Wrote Static Pod manifest for component kube-controller-manager to "/etc/kubernetes/manifests/kube-controller-manager.yaml"

[controlplane] Wrote Static Pod manifest for component kube-scheduler to "/etc/kubernetes/manifests/kube-scheduler.yaml"

[init] Waiting for the kubelet to boot up the control plane as Static Pods from directory "/etc/kubernetes/manifests".

[init] This might take a minute or longer if the control plane images have to be pulled.

[apiclient] All control plane components are healthy after 82.001678 seconds

[uploadconfig] Storing the configuration used in ConfigMap "kubeadm-config" in the "kube-system" Namespace

[markmaster] Will mark node master03.negu.local as master by adding a label and a taint

[markmaster] Master master03.negu.local tainted and labelled with key/value: node-role.kubernetes.io/master=""

[bootstraptoken] Using token: xh3gn7.bz3rfjqrrwjhxtrk

[bootstraptoken] Configured RBAC rules to allow Node Bootstrap tokens to post CSRs in order for nodes to get long term certificate credentials

[bootstraptoken] Configured RBAC rules to allow the csrapprover controller automatically approve CSRs from a Node Bootstrap Token

[bootstraptoken] Configured RBAC rules to allow certificate rotation for all node client certificates in the cluster

[bootstraptoken] Creating the "cluster-info" ConfigMap in the "kube-public" namespace

[addons] Applied essential addon: kube-dns

[addons] Applied essential addon: kube-proxy
Your Kubernetes master has initialized successfully!
To start using your cluster, you need to run the following as a regular user:
mkdir -p $HOME/.kube

sudo cp -i /etc/kubernetes/admin.conf $HOME/.kube/config

sudo chown $(id -u):$(id -g) $HOME/.kube/config
You should now deploy a pod network to the cluster.

Run "kubectl apply -f [podnetwork].yaml" with one of the options listed at:

https://kubernetes.io/docs/concepts/cluster-administration/addons/
You can now join any number of machines by running the following on each node

as root:
kubeadm join 192.168.2.32:6443 --token xh3gn7.bz3rfjqrrwjhxtrk --discovery-token-ca-cert-hash sha256:07ef202802b0c3523a6527c456e476d68f071220396059550500f9a969542503
Con esto ya tendríamos generados nuestros MASTERS en una plataforma de alta disponibilidad On-Premise.
Ahora sólo habría que agregar los Workers, como os expliqué en la siguiente entrada:
https://www.maquinasvirtuales.eu/instalar-cluster-kubernetes-en-debian/
¿Te ha gustado la entrada SÍGUENOS EN TWITTER?
¿Te ha gustado la entrada SÍGUENOS EN TWITTER O INVITANOS A UN CAFE?

Hola Raúl,
lo primero enhorabuena por tú blog, realmente es muy didáctico y de gran ayuda y no puedo decir más que gracias por la dedicación. Quería preguntarte acerca de cómo consigues hacer que funcione kubernetes en LXC, ¿son LXC unprivileged? y también saber si de esta forma tienen mejor rendimiento que sobre máquinas Qemu.
Saludos y muchas gracias
Hola Javi, muchas gracias. Sí, LXC unprivileged. Yo generaría una máquina completa. Esto está bien para un Lab pero no para Producción. Un saludo
¿Qué pasos has seguido para correrlo en unprivileged? en las pruebas que he realizado docker funciona, pero siempre me ha fallado kubeadm creando el master o añadiendo los nodos workers, al final como prueba lo conseguí en LXC pero privileged…
Sí, estoy de acuerdo que para producción también lo montaría sobre Qemu, pero el lab que tengo ahora mismo en recursos es limitado (dos máquinas físicas con solo una ethernet cada una, ninguna conexión más para discos que los que ya tiene el host), y los LXC pueden tener acceso al disco compartiendo una carpeta cualquiera del host y con mejor rendimiento que Qemu, que tiraría de NFS o 9p virtio.
Saludos