 Blog Virtualizacion Tu Blog de Virtualización en Español. Maquinas Virtuales (El Blog de Negu) en castellano. Blog informática vExpert Raul Unzue

Artículos relacionados

Instalar cluster Kubernetes en Debian
Os vamos a enseñar cómo crear un cluster Debian con 3 nodos para poder usarlo con Kubernetes. Lo que haremos es darles a los 3 nodos un role. Uno de ellos será el master, los otros dos nodos completarán el cluster de Kubernetes.

Partimos de tener tres máquinas virtuales con Debian y actualizadas.
Lo primero es hacer que resuelvan el nombre de las máquinas entre ellas para hacer la gestión más rápida y que se entiendan entre los nodos. Cambiar master-node y slave-node por los nombres de vuestras máquinas virtuales:
hostnamectl set-hostname master-node


hostnamectl set-hostname slave-node
Así que adicionalmente, introducimos en cada máquina virtual, en su fichero hosts las ips y los nombres de las máquinas:
root@KBMASTER:~# nano /etc/hosts

192.168.2.190   KBMASTER.NEGU.LOCAL KBMASTER

192.168.2.202   KUBERNETES01.NEGU.LOCAL KUBERNETES01

192.168.2.195   KUBERNETES02.NEGU.LOCAL KUBERNETES02
Instalación Kubernetes
Lo primero que haremos es instalar Docker en cada nodo:
apt install docker.io
Comprobamos la versión instalada:
root@KUBERNETES02:~# docker --version

Docker version 18.09.1, build 4c52b90
Habilitamos el servicio para que arranque al iniciar el sistema operativo en cada nodo:
root@KUBERNETES01:~# systemctl enable docker

Synchronizing state of docker.service with SysV service script with /lib/systemd/systemd-sysv-install.

Executing: /lib/systemd/systemd-sysv-install enable docker
Agregamos la key de Kubernetes para todos los nodos:
root@KBMASTER:~# apt-get install curl
root@KBMASTER:~# curl -s https://packages.cloud.google.com/apt/doc/apt-key.gpg | sudo apt-key add

OK
Agregamos el repositorio:
root@KUBERNETES02:~# apt-add-repository "deb http://apt.kubernetes.io/ kubernetes-xenial main"
Actualizamos la caché:
root@KUBERNETES01:~# apt-get update

Obj:1 http://security.debian.org/debian-security buster/updates InRelease

Obj:2 http://deb.debian.org/debian buster InRelease

Obj:3 http://deb.debian.org/debian buster-updates InRelease

Des:4 https://packages.cloud.google.com/apt kubernetes-xenial InRelease [8.993 B]
Des:5 https://packages.cloud.google.com/apt kubernetes-xenial/main amd64 Packages [32,2 kB]
Descargados 41,2 kB en 1s (41,6 kB/s)

Leyendo lista de paquetes... Hecho
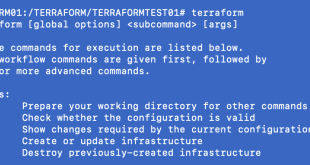
E instalamos kubeadm en los tres nodos:
root@KBMASTER:~# apt install kubeadm
Comprobamos que está bien instalado:
root@KBMASTER:~# kubeadm version

kubeadm version: &version.Info{Major:"1", Minor:"17", GitVersion:"v1.17.0", GitCommit:"70132b0f130acc0bed193d9ba59dd186f0e634cf", GitTreeState:"clean", BuildDate:"2019-12-07T21:17:50Z", GoVersion:"go1.13.4", Compiler:"gc", Platform:"linux/amd64"}
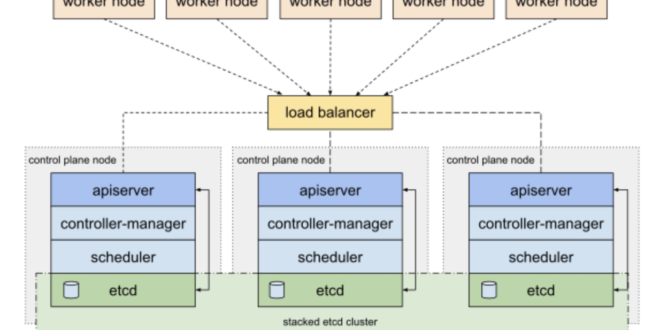
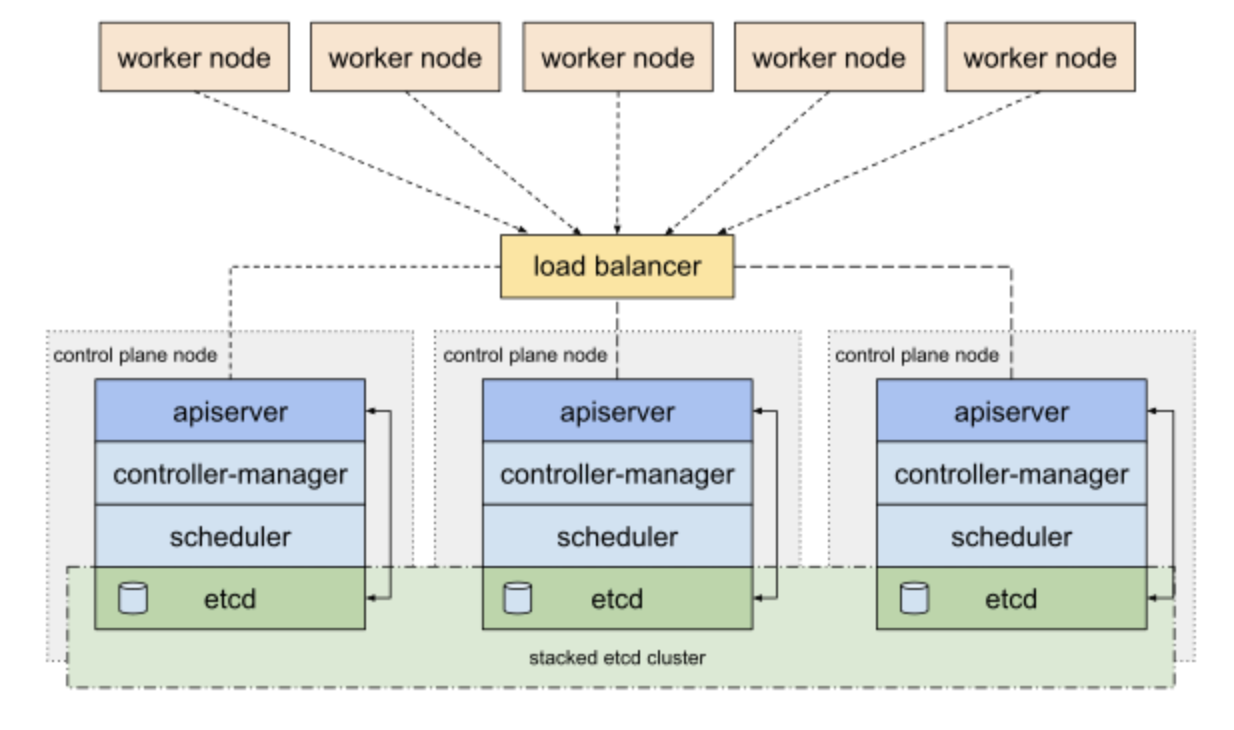
La topología que usaremos es modo Stacked. Si queréis saber más podéis revisar este enlace:
https://kubernetes.io/docs/setup/production-environment/tools/kubeadm/ha-topology/
Configuración clúster Kubernetes
Para implementar Kubernetes deberemos deshabilitar la memoria Swap en el master con el siguiente comando (para que sea persistente comentar la línea también de /etc/fstab):
root@KBMASTER:~# swapoff -a
O:
swapoff -ased -i '/ swap / s/^/#/' /etc/fstab
Ahora inicializaremos el master, dando una subred para nuestra plataforma. Tardará unos minutos:
root@KBMASTER:~# kubeadm init --pod-network-cidr=10.69.0.0/16

W0106 21:29:32.226994    8293 validation.go:28] Cannot validate kube-proxy config - no validator is available

W0106 21:29:32.227153    8293 validation.go:28] Cannot validate kubelet config - no validator is available

[init] Using Kubernetes version: v1.17.0

[preflight] Running pre-flight checks

[WARNING IsDockerSystemdCheck]: detected "cgroupfs" as the Docker cgroup driver. The recommended driver is "systemd". Please follow the guide at https://kubernetes.io/docs/setup/cri/

[preflight] Pulling images required for setting up a Kubernetes cluster

[preflight] This might take a minute or two, depending on the speed of your internet connection

[preflight] You can also perform this action in beforehand using 'kubeadm config images pull'

[kubelet-start] Writing kubelet environment file with flags to file "/var/lib/kubelet/kubeadm-flags.env"

[kubelet-start] Writing kubelet configuration to file "/var/lib/kubelet/config.yaml"

[kubelet-start] Starting the kubelet

[certs] Using certificateDir folder "/etc/kubernetes/pki"

[certs] Generating "ca" certificate and key

[certs] Generating "apiserver" certificate and key

[certs] apiserver serving cert is signed for DNS names [kbmaster kubernetes kubernetes.default kubernetes.default.svc kubernetes.default.svc.cluster.local] and IPs [10.96.0.1 192.168.2.213]
[certs] Generating "apiserver-kubelet-client" certificate and key

[certs] Generating "front-proxy-ca" certificate and key

[certs] Generating "front-proxy-client" certificate and key

[certs] Generating "etcd/ca" certificate and key

[certs] Generating "etcd/server" certificate and key

[certs] etcd/server serving cert is signed for DNS names [kbmaster localhost] and IPs [192.168.2.213 127.0.0.1 ::1]
[certs] Generating "etcd/peer" certificate and key

[certs] etcd/peer serving cert is signed for DNS names [kbmaster localhost] and IPs [192.168.2.213 127.0.0.1 ::1]
[certs] Generating "etcd/healthcheck-client" certificate and key

[certs] Generating "apiserver-etcd-client" certificate and key

[certs] Generating "sa" key and public key

[kubeconfig] Using kubeconfig folder "/etc/kubernetes"

[kubeconfig] Writing "admin.conf" kubeconfig file

[kubeconfig] Writing "kubelet.conf" kubeconfig file

[kubeconfig] Writing "controller-manager.conf" kubeconfig file

[kubeconfig] Writing "scheduler.conf" kubeconfig file

[control-plane] Using manifest folder "/etc/kubernetes/manifests"

[control-plane] Creating static Pod manifest for "kube-apiserver"

[control-plane] Creating static Pod manifest for "kube-controller-manager"

W0106 21:30:07.388079    8293 manifests.go:214] the default kube-apiserver authorization-mode is "Node,RBAC"; using "Node,RBAC"

[control-plane] Creating static Pod manifest for "kube-scheduler"

W0106 21:30:07.393356    8293 manifests.go:214] the default kube-apiserver authorization-mode is "Node,RBAC"; using "Node,RBAC"

[etcd] Creating static Pod manifest for local etcd in "/etc/kubernetes/manifests"

[wait-control-plane] Waiting for the kubelet to boot up the control plane as static Pods from directory "/etc/kubernetes/manifests". This can take up to 4m0s

[apiclient] All control plane components are healthy after 35.501609 seconds

[upload-config] Storing the configuration used in ConfigMap "kubeadm-config" in the "kube-system" Namespace

[kubelet] Creating a ConfigMap "kubelet-config-1.17" in namespace kube-system with the configuration for the kubelets in the cluster

[upload-certs] Skipping phase. Please see --upload-certs

[mark-control-plane] Marking the node kbmaster as control-plane by adding the label "node-role.kubernetes.io/master=''"

[mark-control-plane] Marking the node kbmaster as control-plane by adding the taints [node-role.kubernetes.io/master:NoSchedule]
[bootstrap-token] Using token: 24k2en.wbowfmkuklkwlsmo

[bootstrap-token] Configuring bootstrap tokens, cluster-info ConfigMap, RBAC Roles

[bootstrap-token] configured RBAC rules to allow Node Bootstrap tokens to post CSRs in order for nodes to get long term certificate credentials

[bootstrap-token] configured RBAC rules to allow the csrapprover controller automatically approve CSRs from a Node Bootstrap Token

[bootstrap-token] configured RBAC rules to allow certificate rotation for all node client certificates in the cluster

[bootstrap-token] Creating the "cluster-info" ConfigMap in the "kube-public" namespace

[kubelet-finalize] Updating "/etc/kubernetes/kubelet.conf" to point to a rotatable kubelet client certificate and key

[addons] Applied essential addon: CoreDNS

[addons] Applied essential addon: kube-proxy
Your Kubernetes control-plane has initialized successfully!
To start using your cluster, you need to run the following as a regular user:
mkdir -p $HOME/.kube

sudo cp -i /etc/kubernetes/admin.conf $HOME/.kube/config

sudo chown $(id -u):$(id -g) $HOME/.kube/config
You should now deploy a pod network to the cluster.

Run "kubectl apply -f [podnetwork].yaml" with one of the options listed at:

https://kubernetes.io/docs/concepts/cluster-administration/addons/
Then you can join any number of worker nodes by running the following on each as root:
kubeadm join 192.168.2.190:6443 --token yssgk3.fuq017u179rjybht \

--discovery-token-ca-cert-hash sha256:a0fdd8e375b4593ca3cb7c38509c5ea75f0b132064c51f421daa67d66bcb28f7
La última línea es importante apuntarla porque nos muestra el token y el resto de datos. Nos va a servir para unir nuevos nodos al clúster como veremos en los siguientes pasos. También nos indica que debemos hacer lo siguiente con un usuario que no sea root:
mkdir -p $HOME/.kube

sudo cp -i /etc/kubernetes/admin.conf $HOME/.kube/config

sudo chown $(id -u):$(id -g) $HOME/.kube/config
Agregamos los otros nodos al clúster lanzando el anterior comando:
kubeadm join 192.168.2.190:6443 --token yssgk3.fuq017u179rjybht \

--discovery-token-ca-cert-hash sha256:a0fdd8e375b4593ca3cb7c38509c5ea75f0b132064c51f421daa67d66bcb28f7
Y ya podremos usar nuestro clúster. Si os surgen problemas podéis resetear la configuración con:
kubeadm reset
Primeros pasos cluster Kubernetes
Lo primero que haremos es comprobar que los nodos se han unido correctamente:
raulunzue@KBMASTER:~# kubectl get nodes

NAME           STATUS     ROLES    AGE   VERSION

kbmaster       NotReady   master   13m   v1.17.0

kubernetes01   NotReady      99s   v1.17.0

kubernetes02   NotReady     71s   v1.17.0
El estado es NotReady porque aún no se han generado las redes para los Pods:
raulunzue@KBMASTER:~# kubectl apply -f https://raw.githubusercontent.com/coreos/flannel/master/Documentation/kube-flannel.yml

podsecuritypolicy.policy/psp.flannel.unprivileged created

clusterrole.rbac.authorization.k8s.io/flannel created

clusterrolebinding.rbac.authorization.k8s.io/flannel created

serviceaccount/flannel created

configmap/kube-flannel-cfg created

daemonset.apps/kube-flannel-ds-amd64 created

daemonset.apps/kube-flannel-ds-arm64 created

daemonset.apps/kube-flannel-ds-arm created

daemonset.apps/kube-flannel-ds-ppc64le created

daemonset.apps/kube-flannel-ds-s390x created
Comprobamos los Pods:
raulunzue@KBMASTER:~# kubectl get pods --all-namespaces

NAMESPACE     NAME                               READY   STATUS    RESTARTS   AGE

kube-system   coredns-6955765f44-kjrnv           0/1     Running   0          18m

kube-system   coredns-6955765f44-lb59t           0/1     Running   0          18m

kube-system   etcd-kbmaster                      1/1     Running   0          18m

kube-system   kube-apiserver-kbmaster            1/1     Running   0          18m

kube-system   kube-controller-manager-kbmaster   1/1     Running   0          18m

kube-system   kube-flannel-ds-amd64-97pms        1/1     Running   0          53s

kube-system   kube-flannel-ds-amd64-c2t7z        1/1     Running   0          53s

kube-system   kube-flannel-ds-amd64-pn22m        1/1     Running   0          53s

kube-system   kube-proxy-gvq7w                   1/1     Running   0          6m35s

kube-system   kube-proxy-h9p6l                   1/1     Running   0          18m

kube-system   kube-proxy-k57br                   1/1     Running   0          7m3s

kube-system   kube-scheduler-kbmaster            1/1     Running   0          18m
Y volvemos a revisar que ahora están como Ready:
raulunzue@KBMASTER:~# kubectl get nodes

NAME           STATUS   ROLES    AGE     VERSION

kbmaster       Ready    master   19m     v1.17.0

kubernetes01   Ready       7m51s   v1.17.0

kubernetes02   Ready       7m23s   v1.17.0
Tenemos que agregar reglas al firewall:
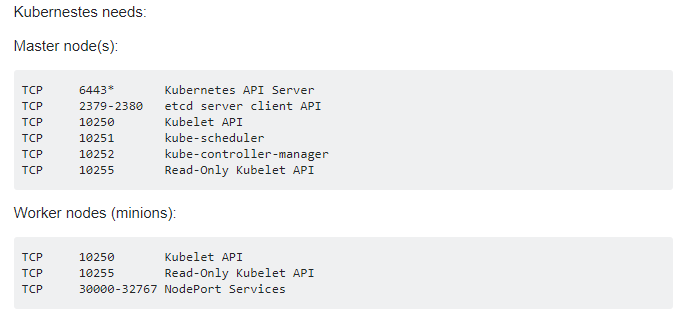
Así ya tenemos operativo nuestro clúster de Kubernetes.
¿Te ha gustado la entrada SÍGUENOS EN TWITTER?
¿Te ha gustado la entrada SÍGUENOS EN TWITTER O INVITANOS A UN CAFE?