Implementar SOC: Instalación Wazuh
Seguimos implementando nuestro SOC con software OpenSource.
Como hablamos en la anterior entrada, necesitaremos implementar una solución que nos permita recopilar y analizar los diferentes registros que nos entreguen nuestros sistemas. Para ello usaré Wazuh:
-
- WEB OFICIAL: https://wazuh.com/
- PAQUETES WAZUH: https://documentation.wazuh.com/current/installation-guide/packages-list.html
- Descripción: Permite recopilar y analizar datos de seguridad de un host en el cual se instala un agente. Es una herramienta muy completa, compuesta por una gestión de eventos e información de seguridad (SIEM) y otra de detección y respuesta extendidas (XDR)
Se puede implementar tanto en un host dedicado, en un clúster o en la nube. Tiene la ventaja que es multiplataforma, con lo que podremos traernos con sus diferentes agentes, datos de casi cualquier sistema operativo:
Componentes Wazuh
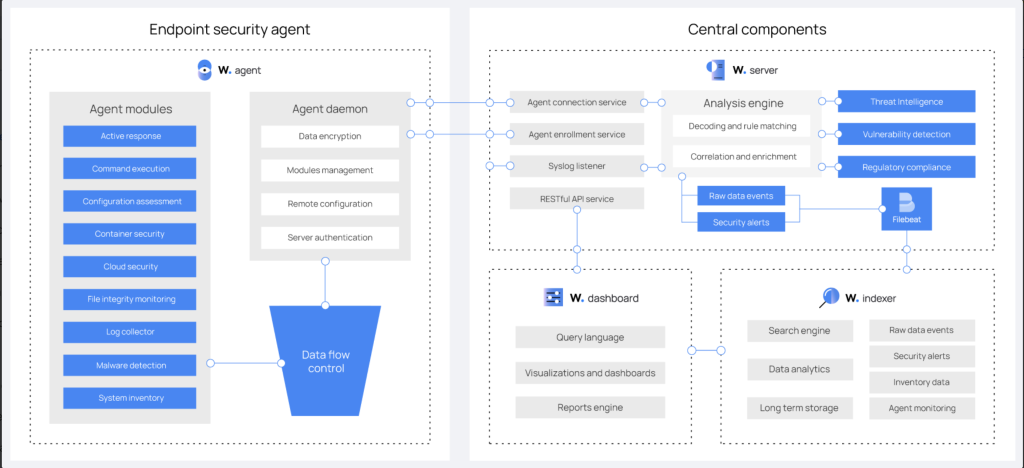
Wazuh se compone de cuatro componentes:
- ENLACE: https://documentation.wazuh.com/current/getting-started/components/index.html
- Wazuh Indexer: Es el componente central, el motor del sistema, lo que permite buscar. almacenar y analizar registros casi en tiempo real. Es totalmente escalable.
- Wazuh Server: Desde este componente se actualizan los agentes, se gestionan y permite analizar los datos que entregan los agentes. Utiliza reglas para gestionar la información y saber si es relevante o no. Un solo servidor puede analizar cientos de registros y puede ser escalado horizontalmente.
- Wazuh Dashboard: Es la parte visual, como su propio nombre indica el dashboard para el usuario administrador. Desde él realizaremos desde la propia gestión de sistema como su configuración
- Wazuh Agents: Los agentes que hemos hablado en el apartado anterior, que permiten entregar los datos a Wazuh Server.
Os dejo el diagrama de los diferentes componentes:
Requisitos de Software y Hardware servidor Wazuh
Wazuh debe ser instalado en un sistema Linux de 64 bits, siendo recomendadas las siguientes distribuciones:
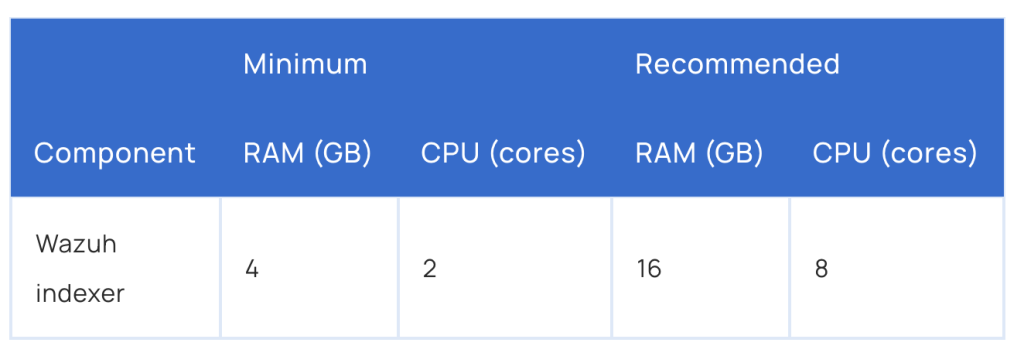
A nivel de hardware, para un nodo necesitaréis un mínimo de RAM y CPU, os dejo la tabla. Entender que cuanto más administradores hagan filtros o consultas al sistema, más capacidad necesitará para procesarla o dependerá del volumen de equipos a gestionar:
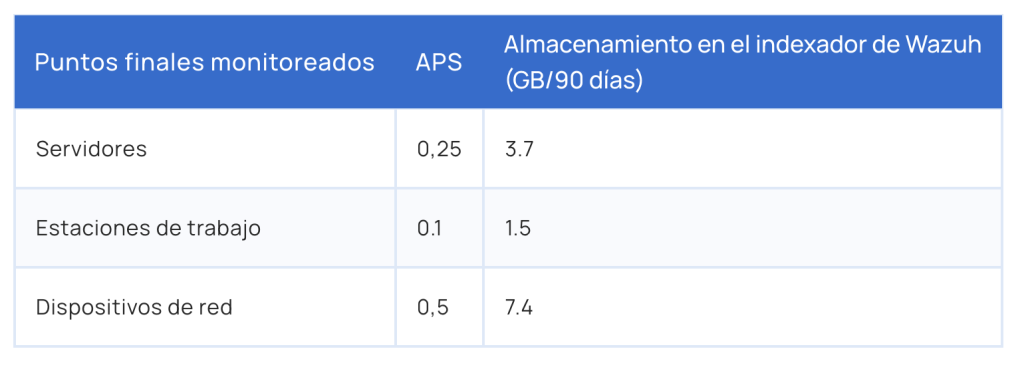
A nivel de disco, dependerá de los registros que queráis almacenar en el tiempo y las alertas generadas por segundo (APS). Por ejemplo, para un entorno con 80 estaciones de trabajo, 10 servidores y 10 dispositivos de red, el almacenamiento necesario en el servidor indexador de Wazuh para 90 días de alertas es de 230 GB:
Una vez que tenemos los datos más importantes de Wazuh, vamos a implementarlo bajo una máquina virtual Proxmox, usaré Ubuntu 22.04, una de las distribuciones que recomiendan.
Instalación servidor Wazuh bajo Ubuntu 22.04 en Proxmox
Me salto la instalación de la máquina virtual en Proxmox que hay varios ejemplos en el blog, y me centro la instalación de los componentes. Lo voy a montar sobre un LXC Ubuntu 22.04 que como es para LAB con estos recursos hardware me valen:
- Ubuntu 22.04
- 4 vCPU
- 4 GB RAM
- 60 GB Disco
Antes de empezar actualizamos el sistema:
|
1 2 |
root@WAZUH01:~# apt update root@WAZUH01:~# apt upgrade -y |
Instalamos los requerimientos:
|
1 |
root@WAZUH01:~# apt install vim curl apt-transport-https unzip wget libcap2-bin software-properties-common lsb-release gnupg2 |
Descargamos el script de instalación, en la versión 4.7 al escribir este artículo, que hará una instalación completa de todos los componentes:
|
1 |
root@WAZUH01:~# curl -sO https://packages.wazuh.com/4.7/wazuh-install.sh && sudo bash ./wazuh-install.sh -a |
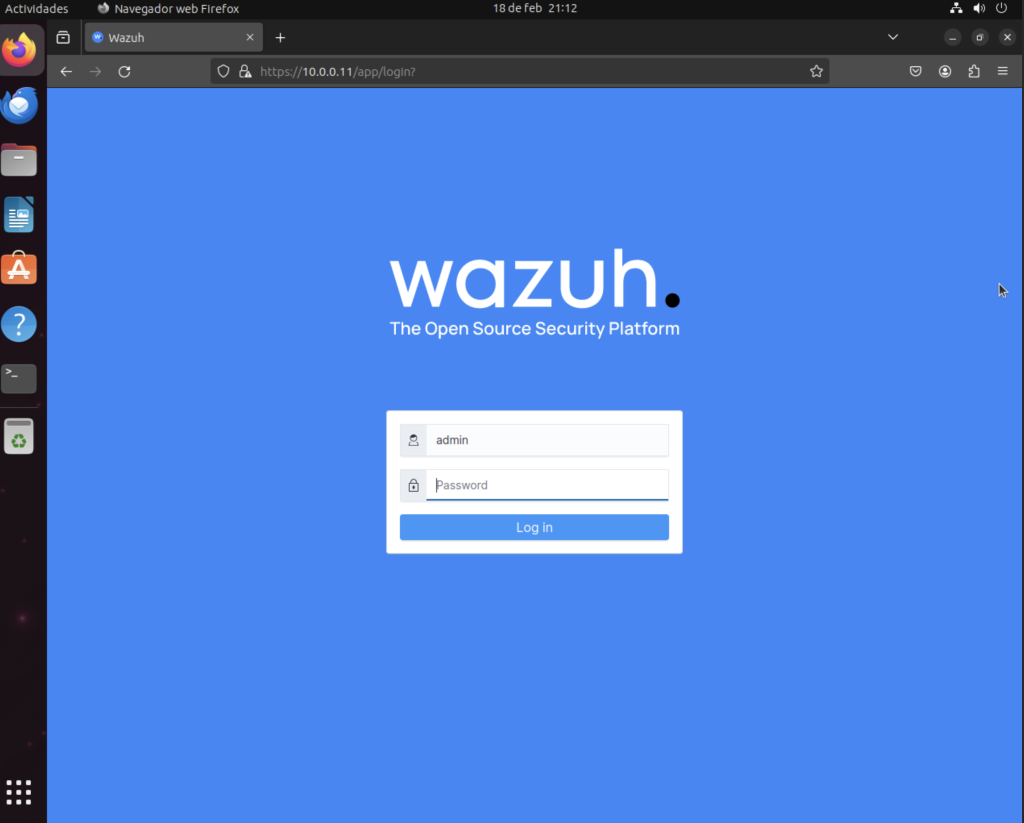
Veréis al final de la instalación el usuario y la contraseña que lo va a gestionar:
|
1 2 3 4 5 6 7 8 9 10 11 12 13 14 15 16 17 18 19 20 21 22 23 24 25 26 27 28 29 30 31 32 33 34 35 36 37 38 39 40 41 42 43 |
root@WAZUH01:~# curl -sO https://packages.wazuh.com/4.7/wazuh-install.sh && sudo bash ./wazuh-install.sh -a 05/02/2024 20:01:58 INFO: Starting Wazuh installation assistant. Wazuh version: 4.7.2 05/02/2024 20:01:58 INFO: Verbose logging redirected to /var/log/wazuh-install.log 05/02/2024 20:02:01 INFO: --- Dependencies ---- 05/02/2024 20:02:01 INFO: Installing gawk. 05/02/2024 20:02:03 INFO: Wazuh web interface port will be 443. 05/02/2024 20:02:06 INFO: Wazuh repository added. 05/02/2024 20:02:06 INFO: --- Configuration files --- 05/02/2024 20:02:06 INFO: Generating configuration files. 05/02/2024 20:02:07 INFO: Created wazuh-install-files.tar. It contains the Wazuh cluster key, certificates, and passwords necessary for installation. 05/02/2024 20:02:07 INFO: --- Wazuh indexer --- 05/02/2024 20:02:07 INFO: Starting Wazuh indexer installation. 05/02/2024 20:02:54 INFO: Wazuh indexer installation finished. 05/02/2024 20:02:54 INFO: Wazuh indexer post-install configuration finished. 05/02/2024 20:02:54 INFO: Starting service wazuh-indexer. 05/02/2024 20:03:01 INFO: wazuh-indexer service started. 05/02/2024 20:03:01 INFO: Initializing Wazuh indexer cluster security settings. 05/02/2024 20:03:12 INFO: Wazuh indexer cluster initialized. 05/02/2024 20:03:12 INFO: --- Wazuh server --- 05/02/2024 20:03:12 INFO: Starting the Wazuh manager installation. 05/02/2024 20:03:40 INFO: Wazuh manager installation finished. 05/02/2024 20:03:40 INFO: Starting service wazuh-manager. 05/02/2024 20:03:54 INFO: wazuh-manager service started. 05/02/2024 20:03:54 INFO: Starting Filebeat installation. 05/02/2024 20:03:56 INFO: Filebeat installation finished. 05/02/2024 20:03:57 INFO: Filebeat post-install configuration finished. 05/02/2024 20:03:57 INFO: Starting service filebeat. 05/02/2024 20:03:57 INFO: filebeat service started. 05/02/2024 20:03:57 INFO: --- Wazuh dashboard --- 05/02/2024 20:03:57 INFO: Starting Wazuh dashboard installation. 05/02/2024 20:04:24 INFO: Wazuh dashboard installation finished. 05/02/2024 20:04:24 INFO: Wazuh dashboard post-install configuration finished. 05/02/2024 20:04:24 INFO: Starting service wazuh-dashboard. 05/02/2024 20:04:24 INFO: wazuh-dashboard service started. 05/02/2024 20:05:04 INFO: Initializing Wazuh dashboard web application. 05/02/2024 20:05:05 INFO: Wazuh dashboard web application initialized. 05/02/2024 20:05:05 INFO: --- Summary --- 05/02/2024 20:05:05 INFO: You can access the web interface https://<wazuh-dashboard-ip>:443 User: admin Password: LCs4wZ0GL624Pl.xcZdSdqkqCyM.0qn2 05/02/2024 20:05:05 INFO: --- Dependencies ---- 05/02/2024 20:05:05 INFO: Removing gawk. 05/02/2024 20:05:06 INFO: Installation finished. |
Si queréis cambiar la contraseña:
- DOCUMENTACION: https://documentation.wazuh.com/current/user-manual/user-administration/password-management.html
|
1 |
curl -so wazuh-passwords-tool.sh https://packages.wazuh.com/4.7/wazuh-passwords-tool.sh |
|
1 2 3 |
root@WAZUH01:~# bash wazuh-passwords-tool.sh -u admin -p Secr3tP4ssw*rd 05/02/2024 20:17:32 INFO: Generating password hash 05/02/2024 20:17:34 WARNING: Password changed. Remember to update the password in the Wazuh dashboard and Filebeat nodes if necessary, and restart the services. |
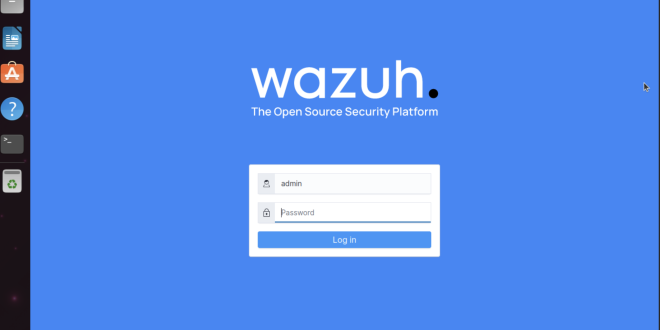
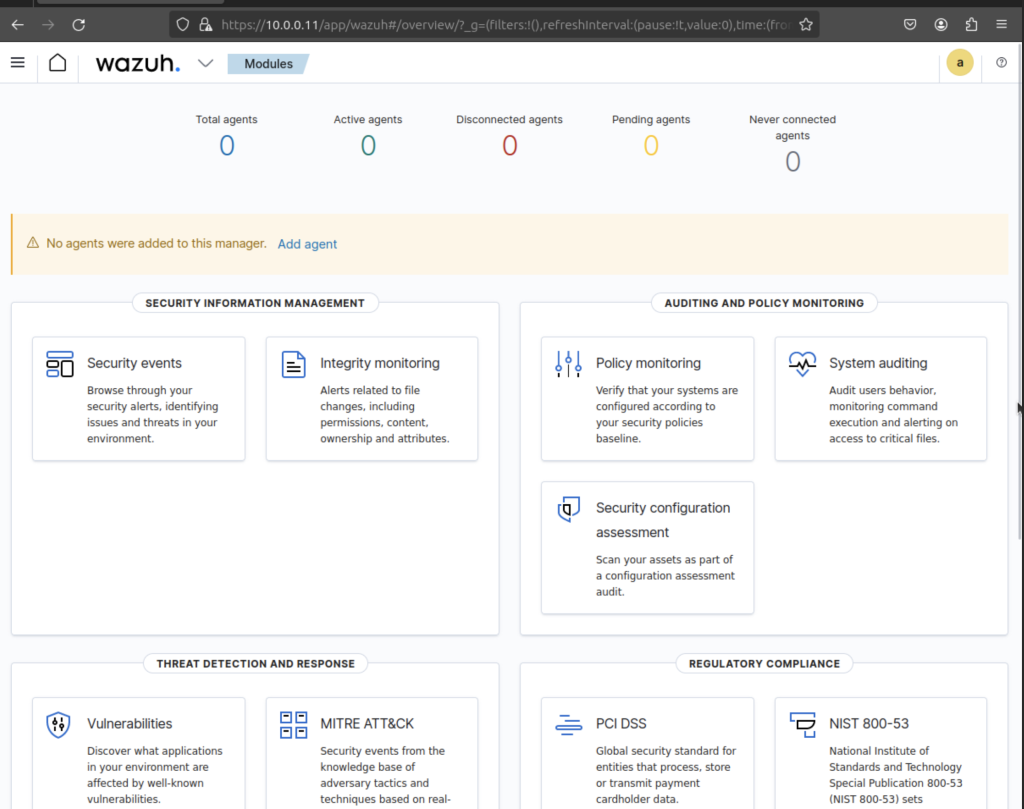
Veremos el dashboard, donde deberemos ir agregando los agentes:
Instalación agente Wazuh
Para instalar el agente y que comunique con el servidor, necesitaremos definir el puerto de comunicación, que por defecto es el 1514 TCP:
Os dejo el resto de valores por defecto: https://documentation.wazuh.com/current/user-manual/reference/ossec-conf/client.html
Para la instalación os dejo los diferentes manuales: https://documentation.wazuh.com/current/installation-guide/wazuh-agent/index.html
El consumo del agente es de unos 36MB, así que no es un problema para cualquier sistema crítico o con bajos recursos.
Lo haré bajo Linux, en mi caso en mi Ubuntu LXC del Suricata, descargamos las keys:
|
1 2 3 4 5 6 7 |
root@SURICATA:~# curl -s https://packages.wazuh.com/key/GPG-KEY-WAZUH | gpg --no-default-keyring --keyring gnupg-ring:/usr/share/keyrings/wazuh.gpg --import && chmod 644 /usr/share/keyrings/wazuh.gpg gpg: keyring '/usr/share/keyrings/wazuh.gpg' created gpg: directory '/root/.gnupg' created gpg: /root/.gnupg/trustdb.gpg: trustdb created gpg: key 96B3EE5F29111145: public key "Wazuh.com (Wazuh Signing Key) <support@wazuh.com>" imported gpg: Total number processed: 1 gpg: imported: 1 |
Agregamos los repos:
|
1 2 |
root@SURICATA:~# echo "deb [signed-by=/usr/share/keyrings/wazuh.gpg] https://packages.wazuh.com/4.x/apt/ stable main" | tee -a /etc/apt/sources.list.d/wazuh.list deb [signed-by=/usr/share/keyrings/wazuh.gpg] https://packages.wazuh.com/4.x/apt/ stable main |
Actualizamos el repo:
|
1 2 3 4 5 6 7 8 9 10 11 12 13 14 15 16 17 18 19 20 21 |
root@SURICATA:~# apt-get update Get:1 https://packages.wazuh.com/4.x/apt stable InRelease [17.3 kB] Hit:2 https://ppa.launchpadcontent.net/oisf/suricata-stable/ubuntu jammy InRelease Get:3 https://packages.wazuh.com/4.x/apt stable/main amd64 Packages [39.0 kB] Hit:4 http://archive.ubuntu.com/ubuntu jammy InRelease Get:5 http://archive.ubuntu.com/ubuntu jammy-updates InRelease [119 kB] Get:6 http://archive.ubuntu.com/ubuntu jammy-security InRelease [110 kB] Get:7 http://archive.ubuntu.com/ubuntu jammy-updates/main amd64 Packages [1377 kB] Get:8 http://archive.ubuntu.com/ubuntu jammy-updates/main Translation-en [273 kB] Get:9 http://archive.ubuntu.com/ubuntu jammy-updates/restricted amd64 Packages [1431 kB] Get:10 http://archive.ubuntu.com/ubuntu jammy-updates/restricted Translation-en [235 kB] Get:11 http://archive.ubuntu.com/ubuntu jammy-updates/universe amd64 Packages [1049 kB] Get:12 http://archive.ubuntu.com/ubuntu jammy-updates/multiverse amd64 Packages [42.1 kB] Get:13 http://archive.ubuntu.com/ubuntu jammy-security/main amd64 Packages [1161 kB] Get:14 http://archive.ubuntu.com/ubuntu jammy-security/main Translation-en [213 kB] Get:15 http://archive.ubuntu.com/ubuntu jammy-security/restricted amd64 Packages [1401 kB] Get:16 http://archive.ubuntu.com/ubuntu jammy-security/restricted Translation-en [231 kB] Get:17 http://archive.ubuntu.com/ubuntu jammy-security/universe amd64 Packages [842 kB] Get:18 http://archive.ubuntu.com/ubuntu jammy-security/universe Translation-en [161 kB] Fetched 8702 kB in 3s (3294 kB/s) Reading package lists... Done |
E instalamos editando la IP de nuestro servidor:
|
1 2 3 4 5 6 7 8 9 10 11 12 13 14 15 16 17 |
root@SURICATA:~# WAZUH_MANAGER="10.0.0.11" apt-get install wazuh-agent Reading package lists... Done Building dependency tree... Done Reading state information... Done The following NEW packages will be installed: wazuh-agent 0 upgraded, 1 newly installed, 0 to remove and 57 not upgraded. Need to get 9379 kB of archives. After this operation, 31.5 MB of additional disk space will be used. Get:1 https://packages.wazuh.com/4.x/apt stable/main amd64 wazuh-agent amd64 4.7.2-1 [9379 kB] Fetched 9379 kB in 1s (12.6 MB/s) Preconfiguring packages ... Selecting previously unselected package wazuh-agent. (Reading database ... 18358 files and directories currently installed.) Preparing to unpack .../wazuh-agent_4.7.2-1_amd64.deb ... Unpacking wazuh-agent (4.7.2-1) ... Setting up wazuh-agent (4.7.2-1) ... |
Y preparamos el servicio:
|
1 2 3 4 |
root@SURICATA:~# systemctl daemon-reload root@SURICATA:~# systemctl enable wazuh-agent Created symlink /etc/systemd/system/multi-user.target.wants/wazuh-agent.service -> /lib/systemd/system/wazuh-agent.service. root@SURICATA:~# systemctl start wazuh-agent |
Como recomendación deshabilitamos los updates automáticos para tener el control:
|
1 2 3 4 5 6 7 |
root@SURICATA:~# sed -i "s/^deb/#deb/" /etc/apt/sources.list.d/wazuh.list root@SURICATA:~# apt-get update Hit:1 https://ppa.launchpadcontent.net/oisf/suricata-stable/ubuntu jammy InRelease Hit:2 http://archive.ubuntu.com/ubuntu jammy InRelease Hit:3 http://archive.ubuntu.com/ubuntu jammy-updates InRelease Hit:4 http://archive.ubuntu.com/ubuntu jammy-security InRelease Reading package lists... Done |
Para desinstalarlo:
|
1 |
apt-get remove wazuh-agent |
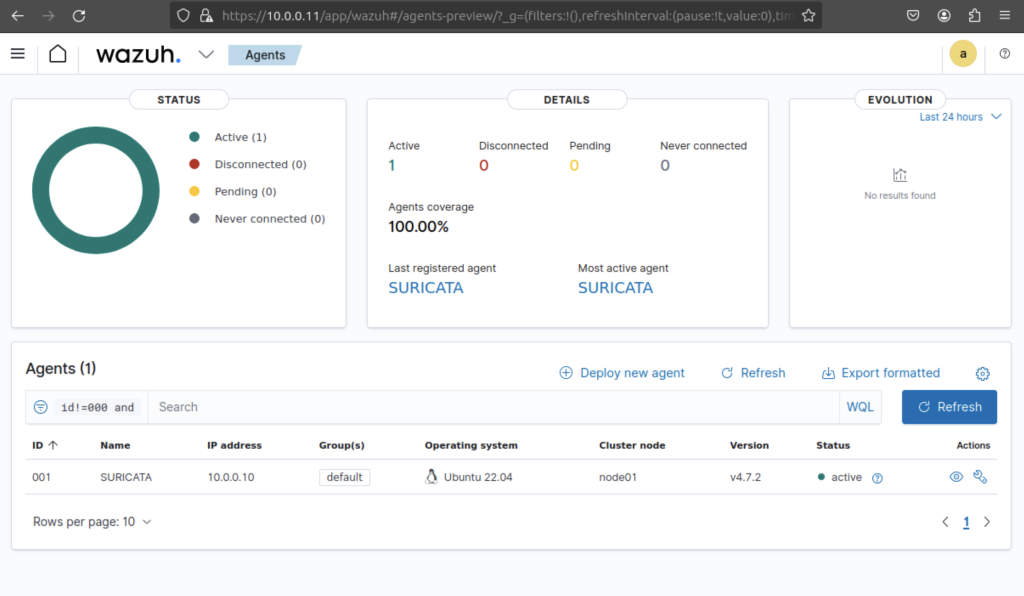
Si todo va bien, veremos que hemos agregado un agente:
Ahora sólo tenemos que ir agregando más agentes y ver como se van generando los eventos y las estadísticas. Más adelante veremos como explotar estos datos cuando todo el SOC esté montado o como montar un clúster de varios nodos para un escalado rápido.
¿Te ha gustado la entrada SÍGUENOS EN TWITTER O INVITANOS A UN CAFE?
 Blog Virtualizacion Tu Blog de Virtualización en Español. Maquinas Virtuales (El Blog de Negu) en castellano. Blog informática vExpert Raul Unzue







Buen día, por favor me puedes ayudar, estoy haciendo el paso a paso de la instalación y me saca error al ejecutar este comando: apt install vim curl apt-transport-https unzip wget libcap2-bin software-properties-common lsb-release gnupg2
Error: Get:3 http://co.archive.ubuntu.com/ubuntu focal-updates/universe amd64 gnupg2 al l 2.2.19-3ubuntu2.2 [5316 B]
Fetched 176 kB in 0s (749 kB/s)
perl: warning: Setting locale failed.
perl: warning: Please check that your locale settings:
LANGUAGE = (unset),
LC_ALL = (unset),
LANG = “es_ES.UTF-8”
are supported and installed on your system.
perl: warning: Falling back to the standard locale (“C”).
locale: Cannot set LC_CTYPE to default locale: No such file or directory
locale: Cannot set LC_MESSAGES to default locale: No such file or directory
locale: Cannot set LC_ALL to default locale: No such file or directory
Selecting previously unselected package apt-transport-https.
Prueba a hacer esto:
echo “export LANGUAGE=en_US.UTF-8
export LANG=en_US.UTF-8
export LC_ALL=en_US.UTF-8″>>~/.bash_profile