RaspBerry: Instalar Docker Swarm en ClusterHat
Seguimos haciendo entradas alrededor de la placa ClusterHat en la que ya montamos un clúster Kubernetes sobre Raspberry Pi 4 y Pi Zero 2W.
Os recuerdo como es la red del clúster hat:
-
- RASPBERRY PI 4 (Master): 172.19.181.254
- RASPBERRY PI ZERO 2W (Nodo 1): 172.19.181.1
- RASPBERRY PI ZERO 2W (Nodo 2): 172.19.181.2
- RASPBERRY PI ZERO 2W (Nodo 3): 172.19.181.3
- RASPBERRY PI ZERO 2W (Nodo 4): 172.19.181.4
Con esto…haremos la instalación de nuestro clúster Docker Swarm
Instalar Docker en RaspBerry Pi Zero y RPi 4 Cluster Hat
Lo primero de todo es instalar docker en nuestras 4 x Raspberry Pi Zero 2W y 1 x Pi 4:
|
1 |
curl -sSL https://get.docker.com | sh |
A mí me dio un pequeño error:
|
1 2 3 4 5 |
root@p0:~# curl -sSL https://get.docker.com | sh # Executing docker install script, commit: 93d2499759296ac1f9c510605fef85052a2c32be + sh -c apt-get update -qq >/dev/null E: Repository 'http://archive.raspberrypi.org/debian buster InRelease' changed its 'Suite' value from 'testing' to 'oldstable' E: Repository 'http://raspbian.raspberrypi.org/raspbian buster InRelease' changed its 'Suite' value from 'stable' to 'oldstable' |
Para salir del error utilicé:
|
1 |
root@p0:~# apt-get update --allow-releaseinfo-change |
Y el comienzo sigue la siguiente vez:
|
1 2 3 4 5 6 7 8 9 10 11 12 13 14 15 16 17 18 19 20 21 22 23 24 25 26 27 28 29 30 31 32 33 34 35 36 37 38 39 40 41 42 43 44 45 46 47 48 49 50 51 52 53 54 55 56 57 58 59 60 |
root@p0:~# curl -sSL https://get.docker.com | sh # Executing docker install script, commit: 93d2499759296ac1f9c510605fef85052a2c32be + sh -c apt-get update -qq >/dev/null + sh -c DEBIAN_FRONTEND=noninteractive apt-get install -y -qq apt-transport-https ca-certificates curl >/dev/null + sh -c curl -fsSL "https://download.docker.com/linux/raspbian/gpg" | gpg --dearmor --yes -o /usr/share/keyrings/docker-archive-keyring.gpg + sh -c echo "deb [arch=armhf signed-by=/usr/share/keyrings/docker-archive-keyring.gpg] https://download.docker.com/linux/raspbian buster stable" > /etc/apt/sources.list.d/docker.list + sh -c apt-get update -qq >/dev/null + sh -c DEBIAN_FRONTEND=noninteractive apt-get install -y -qq --no-install-recommends docker-ce-cli docker-ce >/dev/null + version_gte 20.10 + [ -z ] + return 0 + sh -c DEBIAN_FRONTEND=noninteractive apt-get install -y -qq docker-ce-rootless-extras >/dev/null + sh -c docker version Client: Docker Engine - Community Version: 20.10.11 API version: 1.41 Go version: go1.16.9 Git commit: dea9396 Built: Thu Nov 18 00:36:42 2021 OS/Arch: linux/arm Context: default Experimental: true Server: Docker Engine - Community Engine: Version: 20.10.11 API version: 1.41 (minimum version 1.12) Go version: go1.16.9 Git commit: 847da18 Built: Thu Nov 18 00:34:59 2021 OS/Arch: linux/arm Experimental: false containerd: Version: 1.4.12 GitCommit: 7b11cfaabd73bb80907dd23182b9347b4245eb5d runc: Version: 1.0.2 GitCommit: v1.0.2-0-g52b36a2 docker-init: Version: 0.19.0 GitCommit: de40ad0 ================================================================================ To run Docker as a non-privileged user, consider setting up the Docker daemon in rootless mode for your user: dockerd-rootless-setuptool.sh install Visit https://docs.docker.com/go/rootless/ to learn about rootless mode. To run the Docker daemon as a fully privileged service, but granting non-root users access, refer to https://docs.docker.com/go/daemon-access/ WARNING: Access to the remote API on a privileged Docker daemon is equivalent to root access on the host. Refer to the 'Docker daemon attack surface' documentation for details: https://docs.docker.com/go/attack-surface/ ================================================================================ |
Hay que repetirlo en todos los nodos del clúster.
Configurar Master Docker Swarm en Raspberry Pi 4 de Cluster Hat
Para completar el master, nuestra raspberry pi 4, lanzamos el siguiente comando:
|
1 |
docker swarm init --advertise-addr 172.19.180.254 |
Configurar nodos Docker Swarm en Raspberry Pi Zero 2W de Cluster Hat
El comando anterior nos genera un comando que usaremos en cada raspberry pi zero 2w:
|
1 2 3 4 5 6 7 8 |
root@p0:~# docker swarm init --advertise-addr 172.19.180.254 Swarm initialized: current node (zittfqgksbuh365582pc34y9z) is now a manager. To add a worker to this swarm, run the following command: docker swarm join --token SWMTKN-1-5qgdyuadqrfk71asngr6bjy8t8kq29sm3hfimqb3l8qzw6jxmx-6y7730ystgp6h73iajf13zc8b 172.19.180.254:2377 To add a manager to this swarm, run 'docker swarm join-token manager' and follow the instructions. |
Si todo va bien:
|
1 2 |
root@p1:~# docker swarm join --token SWMTKN-1-5qgdyuadqrfk71asngr6bjy8t8kq29sm3hfimqb3l8qzw6jxmx-6y7730ystgp6h73iajf13zc8b 172.19.180.254:2377 This node joined a swarm as a worker. |
Luego verificáis que el clúster está arriba:
|
1 2 3 4 5 6 7 |
pi@p0:~ $ sudo docker node ls ID HOSTNAME STATUS AVAILABILITY MANAGER STATUS ENGINE VERSION zittfqgksbuh365582pc34y9z * p0 Ready Active Leader 20.10.11 cxksjfkdyr96n0u5j9u82gcr1 p1 Ready Active 20.10.11 v1ysx37y8yyvcya1c9yaer6x9 p2 Ready Active 20.10.11 tfb79sopkpdagx2s8867s58gj p3 Ready Active 20.10.11 zsb4bg5oih6h2ah5ve1z6huor p4 Ready Active 20.10.11 |
Aseguraros que el servicio docker levantará al reiniciar:
|
1 2 3 |
pi@p0:~ $ sudo systemctl enable docker Synchronizing state of docker.service with SysV service script with /lib/systemd/systemd-sysv-install. Executing: /lib/systemd/systemd-sysv-install enable docker |
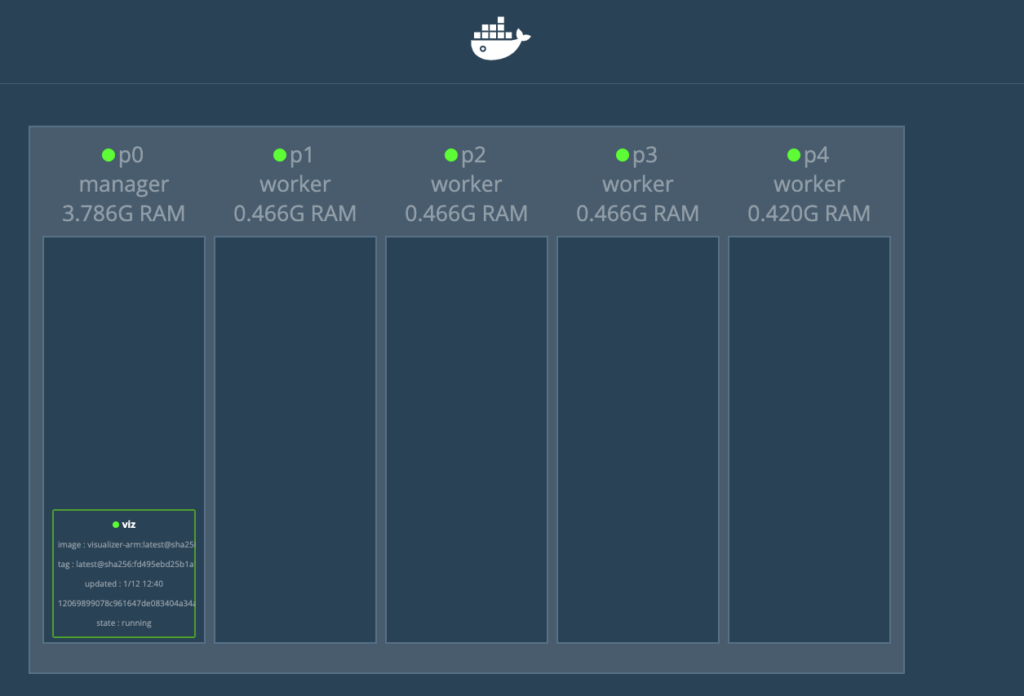
Crear docker visualizer en ClusterHat
Ahora creamos un contenedor, por ejemplo, docker visualizer:
|
1 2 3 4 5 6 |
sudo docker service create \ --name viz \ --publish 8080:8080/tcp \ --constraint node.role==manager \ --mount type=bind,src=/var/run/docker.sock,dst=/var/run/docker.sock \ alexellis2/visualizer-arm:latest |
Espero que os parezca interesante…compartir. Creo que Docker Swarm pega más a este nivel de hardware que Kubernetes con K3S.
¿Te ha gustado la entrada SÍGUENOS EN TWITTER O INVITANOS A UN CAFE?
 Blog Virtualizacion Tu Blog de Virtualización en Español. Maquinas Virtuales (El Blog de Negu) en castellano. Blog informática vExpert Raul Unzue




Un comentario
Pingback: Docker Swarm: Publicar servicios clúster - Blog Virtualizacion