Instalar GlusterFS en Centos 7
Hoy quiero mostraros otro tipo de infraestructura hiperconvergente de almacenamiento. Este año hemos hablado de Datacore, S2D, vSAN…esta vez no nos vamos a ir a un software propietario, aunque RedHat lo use, se trata de GlusterFS.
¿Qué es GlusterFS?
GlusterFS es un proyecto Opensource que permite generar una infraestructura de almacenamiento distribuido fácilmente escalable, enfocado a la alta disponibilidad y simple de implementar.
Los conceptos que encontraremos en GlusterFS son:
- Brick: Un brick o “ladrillo” es básicamente cualquier directorio o partición que será compartido y que está asignado a un volumen.
- Volumen: es una colección lógica de Bricks
Tipos de volúmenes y arquitectura GlusterFS
Existen diferentes formas de montar volúmenes en GlusterFS, que os voy a explicar a grandes rasgos. Si necesitáis más detalles os dejo el enlace al proyecto.
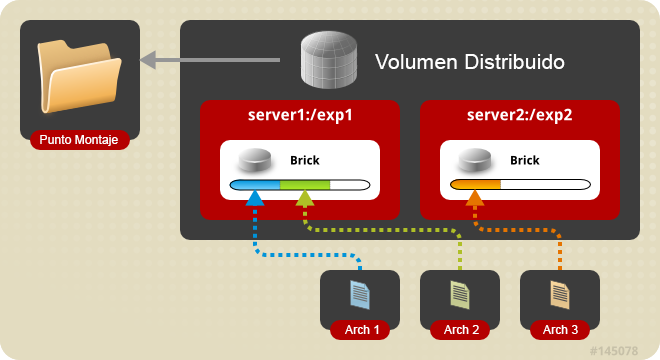
- Distributed Glusterfs Volume: Es el volumen más simple que existe en GlusterFS y si no lo especificamos es el que se configura por defecto. Este volumen no proporciona redundancia, ya que un archivo se almacena sólo en un brick
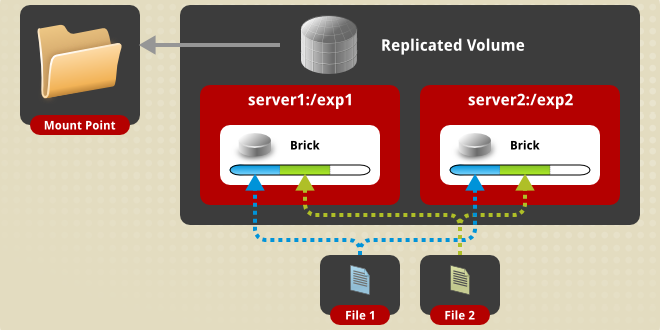
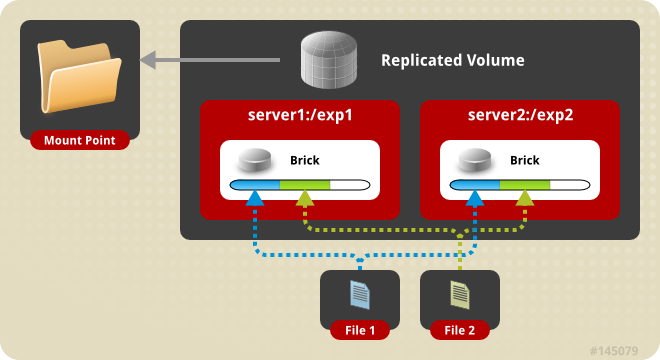
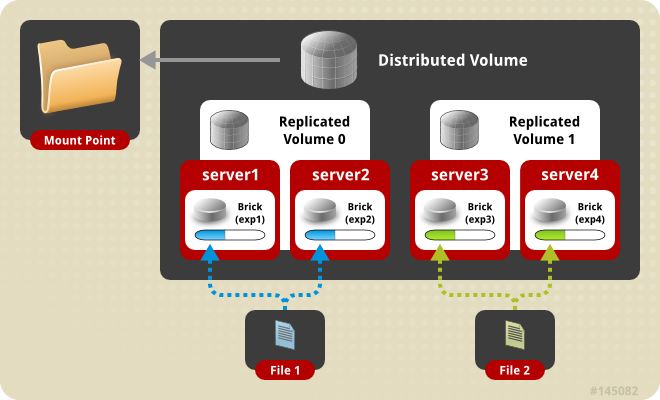
- Replicated Glusterfs Volume: En este tipo de volumen cada brick mantiene una copia exacta de los ficheros, consiguiendo una redundancia del dato. Podremos tener tantas copias como bricks generemos.
- Distributed Replicated Glusterfs Volume: En este tipo de volúmenes los datos se distribuyen en conjuntos duplicados de bricks, una de las cosas que tendremos que tener en cuenta es que los bricks deben ser múltiplos de los volúmenes replicados.
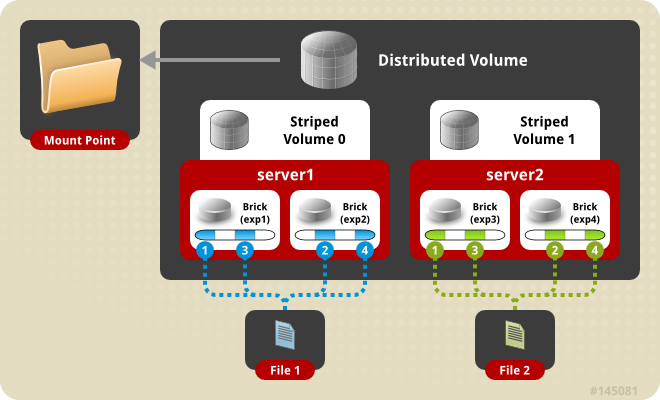
- Striped Glusterfs Volume: En este tipo de volúmenes los archivos se dividen en secciones, de forma que los archivos muy grandes y con gran uso no son un problema para el rendimiento. Perdemos la redundancia de los datos.
- Distributed Striped Glusterfs Volume: Sería igual que el anterior, con la salvedad que pueden ser distribuidos en muchos más bricks.
Requisitos GlusterFS en Centos 7
Vamos a explicar los requisitos en mínimos:
- Número de nodos: mínimo 2 hosts (recomendado mínimo 3)
- Cores: mínimo 2 cores
- CPU: 2.4Ghz mínimo
- RAM: 8GB mínimo
- Disco: 100GB mínimo
Puertos necesarios:
- TCP 24007 para el GlusterFS Daemon
- TCP 24008 para el GlusterFS Management
- TCP 2222, para conexión sshd entre GlusterFS pods
- TCP 49152-49251 para los Brick de los volúmenes
Laboratorio GlusterFS en Centos 7 VMware
Después de la teoría, vamos a ir a la práctica. Voy a montarlo sobre 3 máquinas virtuales en VMware con los siguientes recursos:
- Centos 7 Minimal
- 8 GB de RAM
- Disco: 16GB para SO (sda) y 100GB para Volumen(sdb)
- 2 vCPU
Direcciones IPs del LAB:
- GLUSTERFS01: 192.168.2.20
- GLUSTERFS02: 192.168.2.22
- GLUSTERFS03: 192.168.2.23
En el primer arranque modificamos la tarjeta para que arranque en el inicio y cambiamos a IP estática en cada nodo:
|
1 2 3 4 5 6 7 8 9 10 11 12 13 14 15 |
[root@localhost ~]# cd /etc/sysconfig/network-scripts/ [root@localhost network-scripts]# vi ifcfg-ens192 ... BOOTPROTO=static IPV6INIT=no IPV6_AUTOCONF=no ONBOOT=yes IPADDR=192.168.2.20 PREFIX=24 GATEWAY=192.168.2.69 DNS1=8.8.4.4 DNS2=8.8.8.8 ... |
Deshabilitamos NetworkManager:
|
1 2 3 4 5 6 7 8 9 10 11 |
[root@localhost network-scripts]# systemctl stop NetworkManager [root@localhost network-scripts]# systemctl disable NetworkManager Removed symlink /etc/systemd/system/multi-user.target.wants/NetworkManager.service. Removed symlink /etc/systemd/system/dbus-org.freedesktop.NetworkManager.service. Removed symlink /etc/systemd/system/dbus-org.freedesktop.nm-dispatcher.service. [root@localhost ~]# systemctl restart network.service |
Dejamos Selinux en permisivo o deshabilitado (salvo que lo queráis utilizarlo):
|
1 2 3 4 5 6 7 8 9 10 11 12 |
vi /etc/sysconfig/selinux # This file controls the state of SELinux on the system. # SELINUX= can take one of these three values: # enforcing - SELinux security policy is enforced. # permissive - SELinux prints warnings instead of enforcing. # disabled - No SELinux policy is loaded. SELINUX=disabled # SELINUXTYPE= can take one of three two values: # targeted - Targeted processes are protected, # minimum - Modification of targeted policy. Only selected processes are protected. # mls - Multi Level Security protection. SELINUXTYPE=targeted |
Añadimos el repositorio EPEL para Centos 7:
|
1 |
[root@localhost ~]# yum install epel-release |
Buscamos GlusterFS:
|
1 2 3 4 5 6 7 8 9 10 11 12 13 14 |
[root@localhost ~]# yum search centos-release-gluster Complementos cargados:fastestmirror Loading mirror speeds from cached hostfile * base: mirror.tedra.es * epel: mirror.airenetworks.es * extras: mirror.tedra.es * updates: mirror.tedra.es ============================================================= N/S matched: centos-release-gluster ============================================================= centos-release-gluster-legacy.noarch : Disable unmaintained Gluster repositories from the CentOS Storage SIG centos-release-gluster40.x86_64 : Gluster 4.0 (Short Term Stable) packages from the CentOS Storage SIG repository centos-release-gluster41.noarch : Gluster 4.1 (Long Term Stable) packages from the CentOS Storage SIG repository centos-release-gluster5.noarch : Gluster 5 packages from the CentOS Storage SIG repository Nombre y resumen que coinciden con y sólo , use "buscar todo" para todo. |
Instalamos la versión estable:
|
1 |
[root@localhost ~]# yum install centos-release-gluster41.noarch |
E instalamos los paquetes necesarios:
|
1 |
yum install glusterfs gluster-cli glusterfs-libs glusterfs-server |
Yo adicionalmente deshabilito y paro el firewall:
|
1 2 3 4 |
[root@localhost ~]# systemctl disable firewalld Removed symlink /etc/systemd/system/multi-user.target.wants/firewalld.service. Removed symlink /etc/systemd/system/dbus-org.fedoraproject.FirewallD1.service. [root@localhost ~]# systemctl stop firewalld |
Agregamos al fichero /etc/hosts los nodos:
|
1 2 3 4 5 6 7 |
[root@localhost ~]# vi /etc/hosts 192.168.2.20 glusterfs01 192.168.2.21 glusterfs02 192.168.2.22 glusterfs03 |
Arrancamos el servicio de glusterfs:
|
1 2 3 4 5 6 7 8 9 10 11 12 13 14 15 |
[root@localhost ~]# service glusterd start Redirecting to /bin/systemctl start glusterd.service [root@localhost ~]# service glusterd status Redirecting to /bin/systemctl status glusterd.service ● glusterd.service - GlusterFS, a clustered file-system server Loaded: loaded (/usr/lib/systemd/system/glusterd.service; disabled; vendor preset: disabled) Active: active (running) since sáb 2018-12-29 23:37:40 CET; 5s ago Process: 15801 ExecStart=/usr/sbin/glusterd -p /var/run/glusterd.pid --log-level $LOG_LEVEL $GLUSTERD_OPTIONS (code=exited, status=0/SUCCESS) Main PID: 15802 (glusterd) CGroup: /system.slice/glusterd.service └─15802 /usr/sbin/glusterd -p /var/run/glusterd.pid --log-level INFO dic 29 23:37:40 localhost.localdomain systemd[1]: Starting GlusterFS, a clustered file-syste..... dic 29 23:37:40 localhost.localdomain systemd[1]: Started GlusterFS, a clustered file-system...r. Hint: Some lines were ellipsized, use -l to show in full. |
Creo un volumen físico con sdb que es el disco de 100GB que voy a utilizar:
|
1 2 |
[root@localhost ~]# pvcreate /dev/sdb Physical volume "/dev/sdb" successfully created. |
Creamos un volumen group:
|
1 2 |
[root@localhost ~]# vgcreate vg_gluster /dev/sdb Volume group "vg_gluster" successfully created |
Generamos logicals volumenes, dos bricks en cada nodo:
|
1 2 3 4 |
[root@localhost ~]# lvcreate -L 50G -n brick1 vg_gluster Logical volume "brick1" created. [root@localhost ~]# lvcreate -L 50G -n brick2 vg_gluster Logical volume "brick2" created. |
Ahora le damos el formato. RedHat suele elegir XFS para entornos corporativos y es lo que usaremos, pero depende un poco del rendimiento que le queramos sacar elegiremos uno u otro (BTRFS o EXT4 son otras grandes alternativas):
|
1 2 3 4 5 6 7 8 9 10 11 12 13 14 15 16 17 18 19 20 |
[root@localhost ~]# mkfs.xfs /dev/vg_gluster/brick1 meta-data=/dev/vg_gluster/brick1 isize=512 agcount=4, agsize=3211264 blks = sectsz=512 attr=2, projid32bit=1 = crc=1 finobt=0, sparse=0 data = bsize=4096 blocks=12845056, imaxpct=25 = sunit=0 swidth=0 blks naming =version 2 bsize=4096 ascii-ci=0 ftype=1 log =internal log bsize=4096 blocks=6272, version=2 = sectsz=512 sunit=0 blks, lazy-count=1 realtime =none extsz=4096 blocks=0, rtextents=0 [root@localhost ~]# mkfs.xfs /dev/vg_gluster/brick2 meta-data=/dev/vg_gluster/brick2 isize=512 agcount=4, agsize=3211264 blks = sectsz=512 attr=2, projid32bit=1 = crc=1 finobt=0, sparse=0 data = bsize=4096 blocks=12845056, imaxpct=25 = sunit=0 swidth=0 blks naming =version 2 bsize=4096 ascii-ci=0 ftype=1 log =internal log bsize=4096 blocks=6272, version=2 = sectsz=512 sunit=0 blks, lazy-count=1 realtime =none extsz=4096 blocks=0, rtextents=0 |
Creamos el punto de montaje del volumen que irá en cada nodo:
|
1 |
mkdir -p /bricks/brick{1,2} |
Montamos cada brick en un punto de montaje. Lo haré sobre /etc/fstab :
|
1 2 |
/dev/vg_gluster/brick1 /bricks/brick1 xfs defaults 0 0 /dev/vg_gluster/brick2 /bricks/brick2 xfs defaults 0 0 |
Lanzamos el montaje automático:
|
1 |
[root@localhost ~]# mount -a |
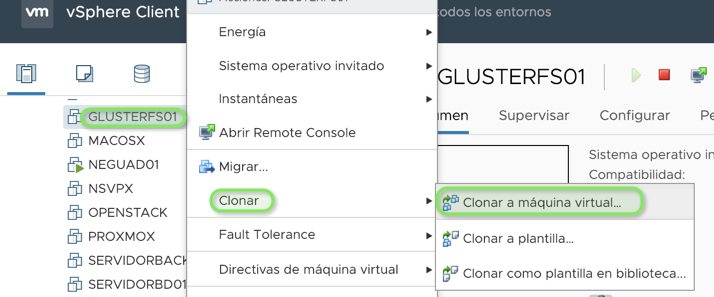
En este punto clono las máquinas con VMware y les modifico las IPs y el hostname a cada una.
Configuramos el pool de Bricks:
|
1 2 3 4 5 6 7 8 9 10 11 12 13 14 15 16 17 18 19 20 |
GLUSTERFS01: [root@localhost ~]# gluster peer probe glusterfs02 peer probe: success. [root@localhost ~]# gluster peer probe glusterfs03 peer probe: success. GLUSTERFS02: [root@localhost ~]# gluster peer probe glusterfs01 peer probe: success. [root@localhost ~]# gluster peer probe glusterfs03 peer probe: success. GLUSTERFS03: [root@localhost ~]# gluster peer probe glusterfs01 peer probe: success. [root@localhost ~]# gluster peer probe glusterfs02 peer probe: success. |
Comprobamos cada nodo:
|
1 2 3 4 5 6 7 8 9 10 11 12 13 14 15 16 17 18 19 20 21 22 23 24 25 26 27 28 29 30 31 32 |
[root@localhost ~]# gluster peer status Number of Peers: 2 Hostname: glusterfs02 Uuid: 2e65b59c-9d21-410a-8fea-bd6c22f6e083 State: Peer in Cluster (Connected) Hostname: glusterfs03 Uuid: 9cd577aa-7135-445d-83f4-20a550ab67e2 State: Peer in Cluster (Connected) [root@localhost ~]# gluster peer status Number of Peers: 2 Hostname: glusterfs01 Uuid: ca83bada-cd0c-45f9-9293-dcd2565d0f69 State: Peer in Cluster (Connected) Hostname: glusterfs03 Uuid: 9cd577aa-7135-445d-83f4-20a550ab67e2 State: Peer in Cluster (Connected) [root@localhost ~]# gluster peer status Number of Peers: 2 Hostname: glusterfs01 Uuid: ca83bada-cd0c-45f9-9293-dcd2565d0f69 State: Peer in Cluster (Connected) Hostname: glusterfs02 Uuid: 2e65b59c-9d21-410a-8fea-bd6c22f6e083 State: Peer in Cluster (Connected) |
Generamos un directorio en cada brick:
|
1 2 3 4 5 6 7 8 9 10 11 12 13 14 15 16 17 |
GLUSTERFS01: mkdir /bricks/brick1/gv0 mkdir /bricks/brick2/gv1 GLUSTERFS02: mkdir /bricks/brick1/gv2 mkdir /bricks/brick2/gv3 GLUSTERFS03: mkdir /bricks/brick1/gv4 mkdir /bricks/brick2/gv5 |
Ahora elegimos el tipo de volumen GlusterFS a generar. Voy a crear un Distributed Striped GlusterFS Volume con los 3 nodos y con 2 bricks cada uno:
|
1 |
[root@localhost ~]# gluster volume create gluster-volume stripe 3 transport tcp glusterfs01:/bricks/brick1/gv0 glusterfs01:/bricks/brick2/gv1 glusterfs02:/bricks/brick1/gv2 glusterfs02:/bricks/brick2/gv3 glusterfs03:/bricks/brick1/gv4 glusterfs03:/bricks/brick2/gv5 force |
Arrancamos el volumen:
|
1 2 |
[root@localhost ~]# gluster volume start gluster-volume volume start: gluster-volume: success |
Comprobamos el estado del volumen:
|
1 2 3 4 5 6 7 8 9 10 11 12 13 14 |
[root@localhost ~]# gluster volume status Status of volume: gluster-volume Gluster process TCP Port RDMA Port Online Pid ------------------------------------------------------------------------------ Brick glusterfs01:/bricks/brick1/gv0 49152 0 Y 16052 Brick glusterfs01:/bricks/brick2/gv1 49153 0 Y 16074 Brick glusterfs02:/bricks/brick1/gv2 49152 0 Y 6657 Brick glusterfs02:/bricks/brick2/gv3 49153 0 Y 6679 Brick glusterfs03:/bricks/brick1/gv4 49152 0 Y 6630 Brick glusterfs03:/bricks/brick2/gv5 49153 0 Y 6652 Task Status of Volume gluster-volume ------------------------------------------------------------------------------ There are no active volume tasks |
Podemos comprobar los volúmenes:
|
1 2 3 4 5 6 7 8 9 10 11 |
[root@localhost ~]# df -h S.ficheros Tamaño Usados Disp Uso% Montado en /dev/mapper/centos-root 14G 1,3G 13G 10% / devtmpfs 3,9G 0 3,9G 0% /dev tmpfs 3,9G 0 3,9G 0% /dev/shm tmpfs 3,9G 8,8M 3,9G 1% /run tmpfs 3,9G 0 3,9G 0% /sys/fs/cgroup /dev/sda1 1014M 186M 829M 19% /boot tmpfs 783M 0 783M 0% /run/user/0 /dev/mapper/vg_gluster-brick1 49G 33M 49G 1% /bricks/brick1 /dev/mapper/vg_gluster-brick2 49G 33M 49G 1% /bricks/brick2 |
Más comprobaciones:
|
1 2 3 4 5 6 7 8 9 10 11 12 13 14 15 16 17 18 19 |
[root@localhost ~]# gluster volume info Volume Name: gluster-volume Type: Distributed-Stripe Volume ID: f3e4991b-6f24-4c48-be8f-e4c800b3f69d Status: Started Snapshot Count: 0 Number of Bricks: 2 x 3 = 6 Transport-type: tcp Bricks: Brick1: glusterfs01:/bricks/brick1/gv0 Brick2: glusterfs01:/bricks/brick2/gv1 Brick3: glusterfs02:/bricks/brick1/gv2 Brick4: glusterfs02:/bricks/brick2/gv3 Brick5: glusterfs03:/bricks/brick1/gv4 Brick6: glusterfs03:/bricks/brick2/gv5 Options Reconfigured: transport.address-family: inet nfs.disable: on |
Ahora montamos glusterfs-volume en una carpeta en /mnt así podremos ya trabajar con él(repetimos en cada nodo):
|
1 2 3 4 5 6 7 8 9 10 11 12 13 14 |
[root@localhost ~]# mkdir /mnt/glusterfs [root@localhost ~]# mount -t glusterfs glusterfs01:/gluster-volume /mnt/glusterfs [root@localhost ~]# df -h S.ficheros Tamaño Usados Disp Uso% Montado en /dev/mapper/centos-root 14G 1,3G 13G 10% / devtmpfs 3,9G 0 3,9G 0% /dev tmpfs 3,9G 0 3,9G 0% /dev/shm tmpfs 3,9G 8,8M 3,9G 1% /run tmpfs 3,9G 0 3,9G 0% /sys/fs/cgroup /dev/sda1 1014M 186M 829M 19% /boot tmpfs 783M 0 783M 0% /run/user/0 /dev/mapper/vg_gluster-brick1 49G 33M 49G 1% /bricks/brick1 /dev/mapper/vg_gluster-brick2 49G 33M 49G 1% /bricks/brick2 glusterfs01:/gluster-volume 294G 3,2G 291G 2% /mnt/glusterfs |
Para montar en el arranque en /etc/fstab:
|
1 |
glusterfs01:/gluster-volume /mnt/glusterfs glusterfs defaults,net_dev,backupvolfile-server=glusterfs02 0 0 |
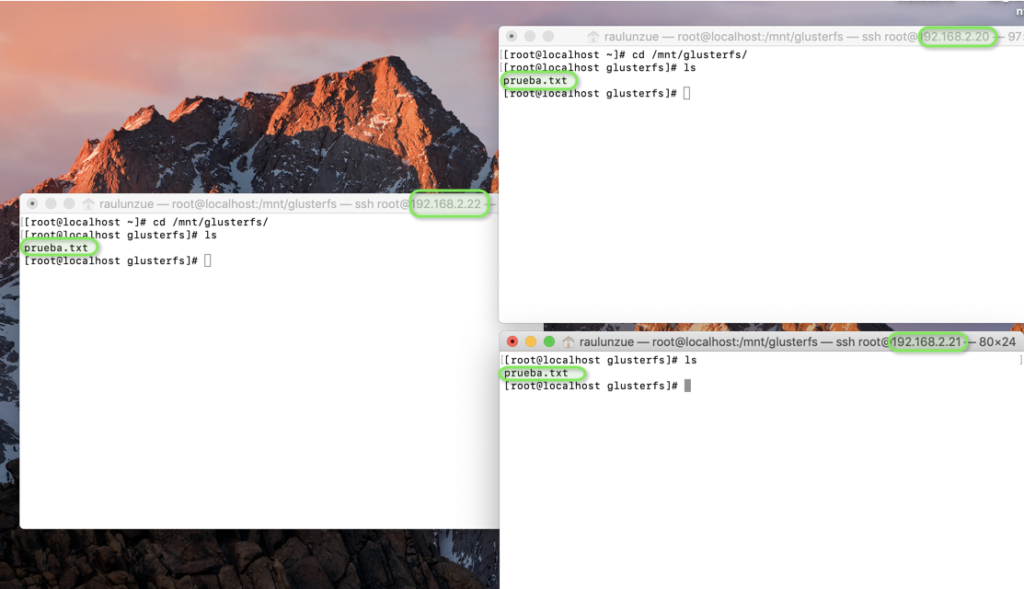
Generamos un fichero y comprobamos que lo vemos de cada nodo:
Ahora tendremos que compartir el recurso vía samba o nfs, por ejemplo, para nuestros clientes. Esto ya en la siguiente entrada…
¿Te ha gustado la entrada SÍGUENOS EN TWITTER?
¿Te ha gustado la entrada SÍGUENOS EN TWITTER O INVITANOS A UN CAFE?
 Blog Virtualizacion Tu Blog de Virtualización en Español. Maquinas Virtuales (El Blog de Negu) en castellano. Blog informática vExpert Raul Unzue

